In this article
- Why Fermentation Goes Wrong
- How to Read Your Dough: Four Reliable Methods
- Method 1: The Aliquot Jar (Most Objective)
- Method 2: Volume Tracking in a Clear Container
- Method 3: The Poke Test
- Method 4: Visual and Tactile Cues
- Signs of Over-Proofed Dough
- During Bulk Fermentation
- During Shaping
- After Baking
- Signs of Under-Proofed Dough
- During Bulk Fermentation
- During Shaping
- After Baking
- The Fool's Crumb: Understanding the Most Misdiagnosed Problem
- The Bulk-to-Final-Proof Continuum
- Pushing Bulk Further
- Ending Bulk Conservatively
- Temperature Interaction
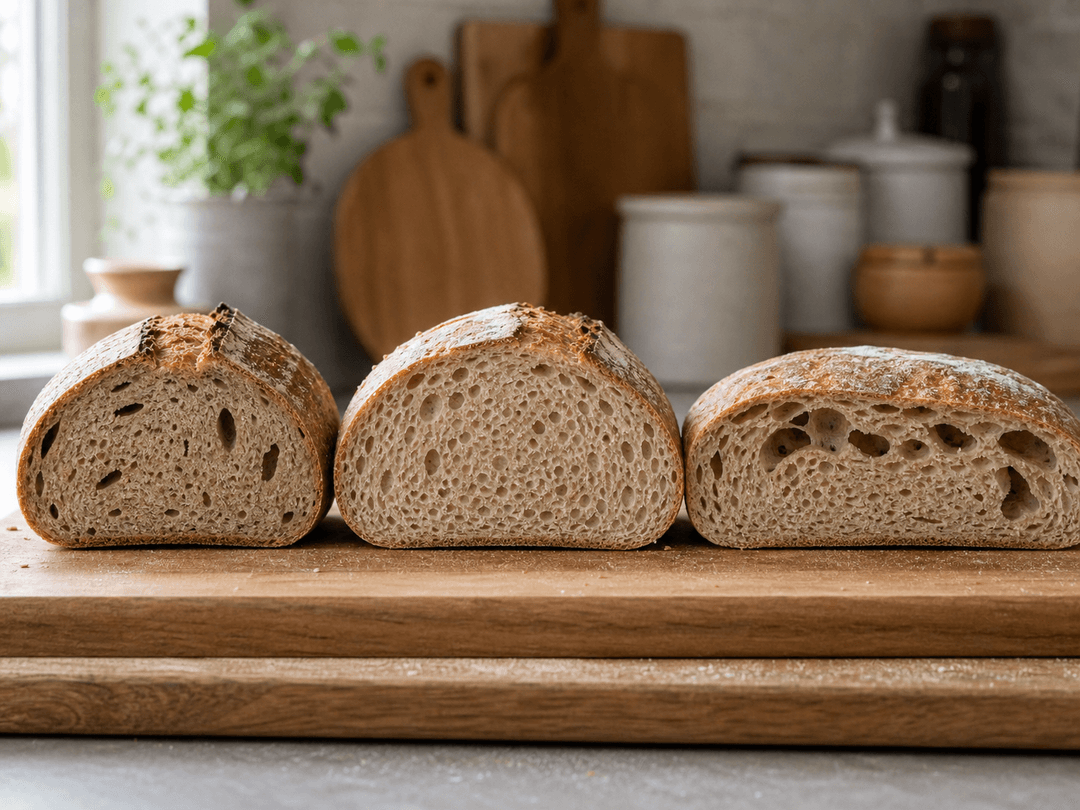
- Crumb Analysis: Reading Your Bread After the Bake
- Under-Proofed Crumb
- Properly Proofed Crumb
- Over-Proofed Crumb
- How to Rescue Dough That Has Gone Wrong
- Rescuing Over-Proofed Dough
- Rescuing Under-Proofed Dough
- A Step-by-Step Protocol for Consistent Proofing
- Common Proofing Mistakes and How to Avoid Them
- Frequently Asked Questions
Over-Proofed or Under-Proofed Sourdough?
Compare over-proofed and under-proofed sourdough with visual signs, poke test cues, crumb diagnosis, and practical fixes.
Fermentation is the soul of sourdough baking. Get it right and you are rewarded with an open, airy crumb, a crust that shatters when you squeeze the loaf, and a flavor that keeps you reaching for another slice. Get it wrong — in either direction — and the result is disappointing bread that doesn't reflect the hours you invested.
The challenge is that fermentation is a moving target. Temperature, starter strength, flour type, hydration, and ambient humidity all influence how fast your dough ferments. A recipe that says "bulk for 4 hours" was written for a specific set of conditions that may not match yours. The only reliable approach is learning to read the dough itself.
This guide teaches you exactly that. You will learn to distinguish over-proofed from under-proofed dough at every stage — during bulk, after shaping, in the crumb after baking — and you will learn what to do when things go wrong.
Why Fermentation Goes Wrong
Before diagnosing the problem, it helps to understand why fermentation is so easy to miss.
Sourdough fermentation is not linear. It starts slowly as yeast and bacteria multiply, accelerates as the population grows, and then decelerates as the organisms exhaust their food supply and acid levels inhibit further activity. The ideal endpoint sits in the middle of the acceleration phase — the dough has enough gas and acid to produce great bread, but the gluten network is still intact enough to hold that gas through shaping, proofing, and baking.
The window between "not quite enough" and "too much" is wider than most bakers fear, but it narrows as conditions intensify. At a dough temperature of 24 °C with 10% starter, you might have a two-hour window where the dough is in good shape. At 28 °C with 20% starter, that window shrinks to 30-45 minutes.
The key insight is that bulk fermentation and final proof are not independent events. They are a continuum. Every minute of bulk fermentation subtracts from the time available for final proof. Push bulk far and the dough needs a shorter final proof. End bulk conservatively and the final proof needs to pick up the slack.
This relationship is the source of most proofing errors.
How to Read Your Dough: Four Reliable Methods
Developing the ability to read your dough is the most valuable skill in sourdough baking. Here are four methods, ordered from most objective to most intuitive.
Method 1: The Aliquot Jar (Most Objective)
The aliquot jar method removes guesswork entirely. After your final mix, pinch off a small piece of dough — about 30 g, roughly walnut-sized — and place it in a small, clear, straight-sided jar. A shot glass, baby food jar, or small mason jar works perfectly. Press the dough flat to the bottom and mark the starting level with a rubber band or strip of tape.
Keep the jar at the same temperature as your main dough. As fermentation progresses, the dough in the jar rises. When it reaches your target rise percentage — typically 50-75% for bulk fermentation before a cold retard, or 75-100% for a room-temperature bulk followed by immediate baking — your main dough is ready.
Why it works: The transparent jar makes volume change unmistakable. You are measuring, not guessing. The aliquot jar does not receive stretch and folds, so it may lag slightly behind the main dough in the early stages. By mid-bulk, the two align closely.
Interpreting the jar:
- 30-50% rise: Early-to-mid bulk. Dough is building structure but needs more time.
- 50-75% rise: The shaping window for most bakers doing a cold retard. Dough has enough gas and acid development to produce good bread.
- 75-100% rise: Appropriate for room-temperature bakes or very cool kitchens. Beyond this, over-fermentation risk increases rapidly.
- More than 100% rise and beginning to dome or flatten: You are at or past the limit. Shape immediately if you have not already.
Method 2: Volume Tracking in a Clear Container
Instead of a separate jar, bulk-ferment your entire dough in a clear, straight-sided container — a Cambro container, tall plastic tub, or large glass bowl. Mark the starting level with a rubber band.
Advantage: You see the actual dough, not a proxy. Disadvantage: Stretch and folds temporarily redistribute gas and can cause the level to drop, which creates confusion. Wait at least 30 minutes after the last fold before making volume judgments.
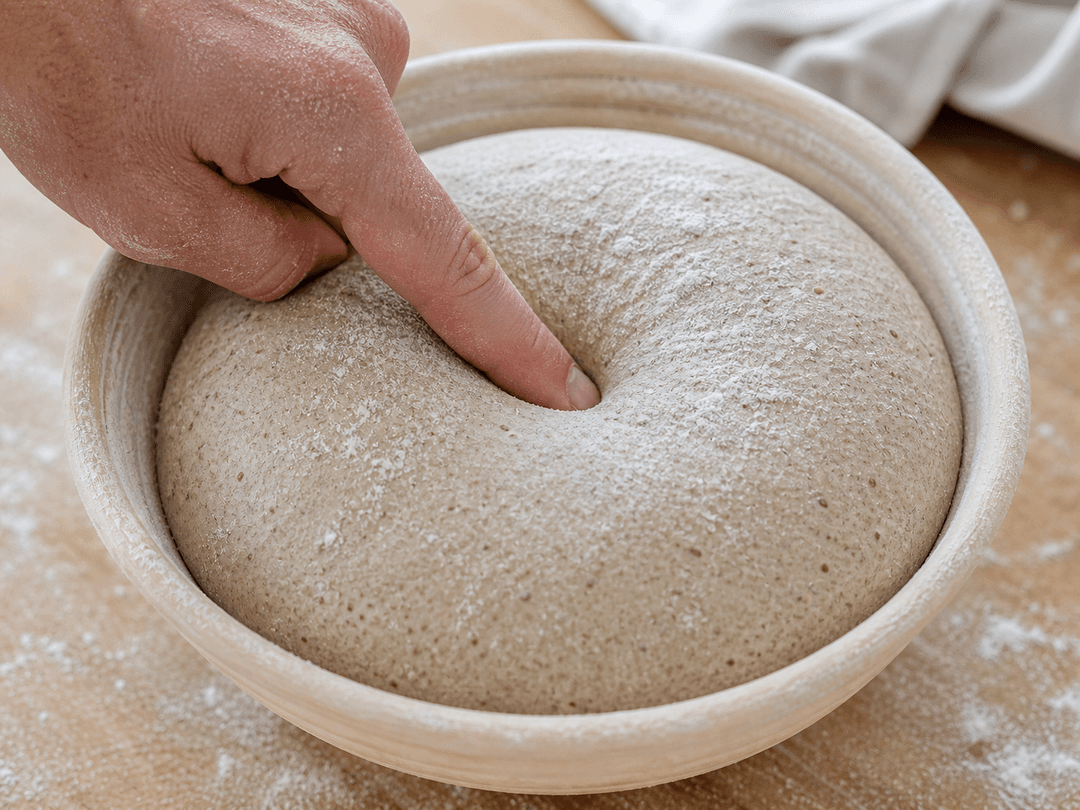
Method 3: The Poke Test
Press a lightly floured finger about 1 cm into the dough surface and observe how it responds:
- Springs back immediately and completely: Under-proofed. The gluten is tight and the dough hasn't developed enough gas. It needs more time.
- Springs back slowly over 2-3 seconds, leaving a slight indent: Properly proofed. The gluten is relaxed but still has structure. This is the sweet spot.
- Does not spring back at all; the indent stays: Over-proofed. The gluten has been weakened by acid and the gas structure is compromised. Shape and bake immediately.
Critical limitation: The poke test works reliably only on room-temperature dough. Cold-retarded dough feels firmer regardless of its fermentation level, making the poke test misleading after refrigeration. Do not use it to evaluate dough straight from the fridge.
Method 4: Visual and Tactile Cues
Experienced bakers read a combination of signs that collectively indicate readiness:
- Domed surface: The top of the dough is gently convex, not flat or concave.
- Visible bubbles: Small bubbles dot the surface and are visible through the sides of a clear container.
- Jiggly but structured: When you tilt or gently shake the container, the dough wobbles like gelatin — it moves as a unified mass rather than flowing like liquid.
- Pulling from edges: The dough begins to pull slightly away from the sides of the container as gas lifts it.
- Lighter feel: When you perform a stretch and fold, the dough feels noticeably lighter and more airy than at the start of bulk.
- Smooth, pillowy surface: The surface looks stretched and slightly glossy, not rough or shaggy.
No single cue is definitive. A domed surface alone does not mean the dough is ready. But a domed, bubbly, jiggly dough that has risen 50-60% and feels light is almost certainly there.
Signs of Over-Proofed Dough
Over-proofing means fermentation has gone too far. The yeast has consumed too much of the available sugar, the bacteria have produced excessive acid, and the gluten network has begun to break down. The dough loses the structural integrity it needs to hold gas, hold its shape, and produce oven spring.
During Bulk Fermentation
- Excessively slack and sticky. The dough has lost its elastic snap. When you try to stretch it, it tears rather than stretching smoothly. It feels almost liquid — more like a thick batter than a dough.
- Acetone or nail-polish-remover smell. A distinct sharp chemical odor, different from the pleasant yeasty or mildly tangy aroma of properly fermented dough. This indicates excessive alcohol production from yeast and a shift toward unpleasant volatile compounds.
- Flat or concave surface. Instead of the gentle dome of properly fermented dough, the surface may flatten or sink as the gas structure collapses.
- Aliquot jar well past 100%. If your aliquot jar has risen 120% or more and the surface is beginning to flatten or collapse, the dough is over-fermented.
During Shaping
- Tears easily. The gluten is too degraded to hold tension. Every attempt to build surface tension pulls the dough apart.
- Impossible to shape. The dough is so slack that it puddles on the bench. It clings to everything and refuses to hold a round or batard shape.
- No spring-back. Poke it and the indent stays. The dough has no resilience.
After Baking
- Flat loaf with minimal oven spring. The bread spreads sideways rather than rising upward.
- Pale crust. The yeast has consumed all available surface sugars, leaving nothing to caramelize during baking. The Maillard reaction and caramelization that produce deep brown color require sugars that are no longer present.
- Collapsed or tunneled crumb. Large irregular holes near the top crust with dense, compressed crumb below. The gas structure was already failing before the bread went into the oven.
- Very sour, unpleasant flavor. Excessive acid production without the balancing sweetness of residual sugars. The bread may taste sharply acidic or almost vinegar-like.
- Gummy texture. The degraded gluten and starch structure produces a crumb that feels sticky or gummy even when the bread has reached the correct internal temperature.
Signs of Under-Proofed Dough
Under-proofing is more common than over-proofing, especially among newer bakers. It happens when fermentation has not progressed far enough — the yeast hasn't produced sufficient gas, the bacteria haven't developed enough acid for flavor, and the gluten hasn't been conditioned enough to expand properly during baking.
During Bulk Fermentation
- Dense and stiff. The dough still feels heavy and tight. It hasn't developed the light, airy quality of properly fermented dough.
- Minimal rise. The aliquot jar or main dough container shows less than 40% increase.
- Rough surface. Instead of a smooth, slightly glossy surface, the dough looks rough, shaggy, or matte.
During Shaping
- Very strong and tight. The dough resists shaping with excessive spring-back. It wants to snap back to its original shape rather than relaxing into the new form.
- Hard to stretch. Pre-shaping and final shaping feel like wrestling the dough. This is often misinterpreted as "good gluten development" when it actually indicates insufficient fermentation.
After Baking
- Dense, tight crumb with few large irregular holes — the infamous "fool's crumb." This pattern features one or two large air pockets in an otherwise very tight interior. The few large holes form because the limited gas that did develop migrated into a small number of cavities rather than distributing evenly through a well-developed, relaxed gluten network.
- Hard, thick crust. Without sufficient gas expansion from the inside, the crust sets quickly and becomes armor-like.
- Gummy center. The dense crumb prevents heat from penetrating efficiently during baking, leaving the center under-baked even when the crust looks done.
- Bursting at unexpected points. The score doesn't open cleanly because there isn't enough internal gas pressure to drive oven spring through the score line. Instead, the bread ruptures wherever the crust happens to be weakest — the sides, the bottom, or random locations.
- Bland flavor. The lactic acid bacteria haven't had enough time to produce the acids that give sourdough its characteristic taste. The bread tastes like plain white bread.
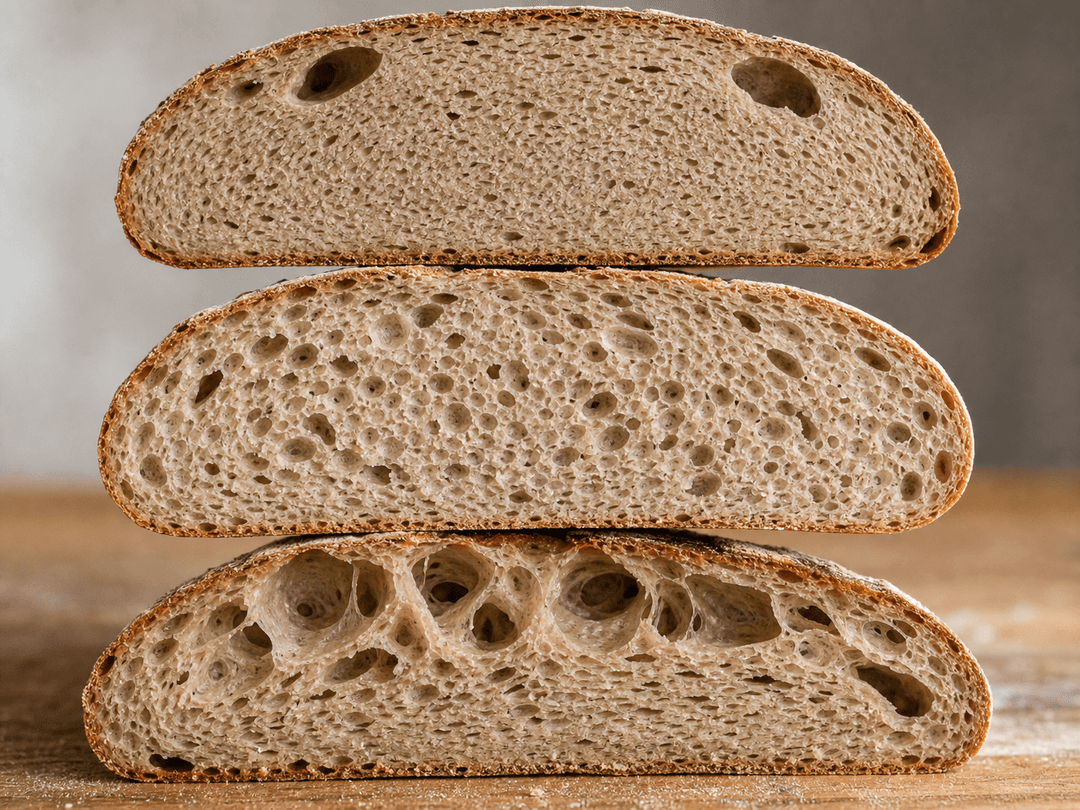
The Fool's Crumb: Understanding the Most Misdiagnosed Problem
The fool's crumb deserves special attention because it is frequently misdiagnosed. Many bakers see one or two large holes in their bread and assume they achieved an open crumb. In reality, these large holes in an otherwise dense loaf are the hallmark of under-proofing — not a sign of success.
What it looks like: A cross-section showing dense, tight bread with perhaps one or two dramatic air pockets, usually near the top of the loaf. The surrounding crumb is compressed and uniform, with tiny or nonexistent holes.
Why it happens: During under-proofed baking, the limited CO2 present in the dough has nowhere to go. The tight gluten structure hasn't been relaxed enough by acid to allow even gas distribution. The small amount of gas that exists coalesces into a few large pockets — following the path of least resistance — rather than distributing into the hundreds of small, even holes that characterize properly proofed bread.
How to distinguish from true open crumb: A true open crumb shows a gradient of hole sizes — small, medium, and large — distributed evenly throughout the loaf. The surrounding structure is thin and translucent. The fool's crumb, by contrast, shows stark contrast: one or two large holes surrounded by dense, bread-machine-like interior with no transition.
The Bulk-to-Final-Proof Continuum
One of the most important concepts for preventing proofing errors is understanding that bulk fermentation and final proof are not separate, independent stages. They are two phases of a single fermentation process.
The total fermentation the dough needs is roughly fixed for a given recipe and set of conditions. How you distribute that fermentation between bulk and final proof is flexible — but the total must add up.
Pushing Bulk Further
If you push bulk fermentation to a higher rise (say 75-100%), the dough enters final proof with most of its fermentation already complete. In this case:
- Final proof should be shorter — perhaps just 1-2 hours at room temperature, or a brief cold retard of 8-12 hours
- The dough will be more relaxed and easier to shape
- Risk of over-proofing during final proof is higher because the margin is thinner
Ending Bulk Conservatively
If you end bulk at a lower rise (say 40-50%), the dough has significant fermentation remaining:
- Final proof needs to be longer to make up the difference
- The dough will be tighter and have more spring during shaping
- Greater buffer against over-proofing during final proof
Temperature Interaction
This relationship shifts with temperature:
In cool climates (below 20 °C): Fermentation is slow. You can safely push bulk to 75-100% rise because the dough ferments so slowly during shaping and cold retard that it barely advances. The longer bulk in cool conditions also builds excellent flavor — more acetic acid develops at lower temperatures.
In warm climates (above 26 °C): Fermentation is fast and aggressive. End bulk at 40-50% rise because the dough will continue fermenting rapidly during shaping (which may take 20-30 minutes) and even during the cold retard (it takes 1-2 hours for a warm dough to cool down enough to slow fermentation). A warm dough shaped at 75% rise could easily be at 110% by the time it goes into the oven.
Crumb Analysis: Reading Your Bread After the Bake
Your finished loaf tells you everything you need to know about your fermentation. Learning to read the crumb is learning to diagnose problems for the next bake.
Under-Proofed Crumb
- Dense and tight throughout, except for possible fool's crumb holes
- Thick cell walls between small, uniform holes
- The interior looks and feels "bread-machine-like" — uniform and compressed
- The crumb may feel gummy or damp, especially near the center
- The base of the loaf is often extremely dense — a thick, heavy bottom
Properly Proofed Crumb
- Even distribution of holes in a gradient of sizes
- Thin, translucent cell walls
- The crumb feels light and airy when you tear a piece
- No gumminess — the interior is fully baked and dry to the touch
- Consistent texture from top to bottom, crust to center
Over-Proofed Crumb
- Large, irregular tunnels or caves, especially near the top crust
- Collapsed or compressed areas where gas structure failed
- The crumb may have a "stringy" or web-like quality
- Dense band near the bottom where heavy, unsupported dough settled
- The overall profile is flat — wide and low rather than tall and domed
How to Rescue Dough That Has Gone Wrong
Not every proofing mistake means the bake is lost. Here are practical rescue strategies for both directions.
Rescuing Over-Proofed Dough
Caught early (dough is slack but not tearing):
- Shape immediately, handling the dough as gently as possible to preserve whatever gas structure remains
- Skip the final proof entirely — the dough has already fermented enough
- Place directly in the fridge for 30-60 minutes to firm up (this is not proofing, just chilling for easier handling)
- Bake straight from the fridge in a preheated Dutch oven
Caught late (dough is tearing, very slack, smells of acetone):
- Do not attempt a traditional loaf — the gluten is too degraded
- Gently spread the dough into an oiled sheet pan and dimple with your fingers
- Drizzle with olive oil, add toppings if desired, and bake as focaccia at 220 °C (425 °F) for 20-25 minutes
- Alternatively, stretch thin and bake as flatbread at high heat for 8-10 minutes
- The bread will still taste quite sour, but the flat format masks the structural problems
Severely over-proofed (liquid consistency, strong acetone smell):
- This dough cannot produce acceptable bread in any format
- Use it as a discard application — sourdough pancakes, crackers, or pizza dough where a flatter outcome and sour flavor are acceptable
- Treat it as a learning moment and adjust your process
Rescuing Under-Proofed Dough
Under-proofed dough is much easier to rescue because you simply need more time.
During bulk (realized the dough isn't ready):
- Continue bulk fermentation — ignore the clock, watch the dough
- If your kitchen is cold, move the dough to a warmer spot: inside the oven with just the light on (26-30 °C), near a radiator, or on top of the refrigerator
- Keep checking the aliquot jar or volume markers every 30 minutes
During final proof (realized the shaped dough needs more time):
- If cold retarding, simply leave the dough in the fridge longer — 24-36 hours instead of 12-16
- If proofing at room temperature, extend the proof and use the poke test to monitor progress
- Do not reshape — this degases the dough and sets you back
After baking (the bread is already out of the oven):
- Under-proofed bread is still perfectly edible — it is dense but not ruined
- It makes excellent toast, croutons, and bread pudding where the dense texture is an advantage
- Record what went wrong and adjust for next time
A Step-by-Step Protocol for Consistent Proofing
Here is a complete workflow that integrates the reading methods above into a reliable proofing protocol:
1. Set up monitoring before mixing. Prepare your aliquot jar and clear bulk container. Have a rubber band ready.
2. After the final mix, take your sample. Pinch off 30 g, press into the jar, mark the level. Place the jar next to your main dough so they stay at the same temperature.
3. Check the aliquot jar every 45-60 minutes during bulk. Note the rise percentage. In a baking log, record the time and rise at each check.
4. Assess with multiple methods at once. When the jar approaches your target rise, also check the main dough: Is the surface domed? Are there visible bubbles? Does it jiggle when you shake the container? Does it feel light during a stretch and fold?
5. Shape when the signals converge. The jar is at your target rise, the dough looks and feels ready, and the poke test gives a slow spring-back. Don't wait for perfection in every signal — three out of four agreeing is enough.
6. During final proof, use the poke test. For room-temperature proofing, check every 30 minutes. For cold retard, resist the temptation to poke the cold dough — trust the process and evaluate by gently pressing the dough through the banneton liner.
7. Record everything. After baking, slice the loaf and photograph the crumb. Note the proofing timeline, temperatures, rise percentages, and crumb result. After five bakes, you will have a personal reference more valuable than any recipe.
Common Proofing Mistakes and How to Avoid Them
Mistake: Following time instead of dough. A recipe that says "bulk 4 hours" was written at a specific temperature. Your kitchen may be warmer or cooler. Always monitor rise percentage and visual cues rather than the clock.
Mistake: Using a cold poke test. The poke test is unreliable on cold dough. If your dough has been in the fridge, do not use the poke test to decide if it is ready. Evaluate by other means — gentle press through the banneton, visual dome, or simply trusting the timeline if your process is established.
Mistake: Degassing during shaping. Aggressive pre-shaping or rough handling can push a well-proofed dough backward. Handle fermented dough gently. The goal of shaping is to create surface tension without destroying the gas structure.
Mistake: Assuming more time always helps. If the dough seems under-proofed, extending the time works — but only if the temperature supports continued fermentation. Leaving a dough at 16 °C for two extra hours may add very little. Moving it to 26 °C for one hour will accomplish more.
Mistake: Not accounting for carry-over fermentation. Fermentation does not stop when you shape the dough. It continues during shaping, during the rest before loading into the banneton, during the first hour of cold retard, and even during the first few minutes in the oven. This carry-over is more significant with warm doughs and in warm kitchens.
Frequently Asked Questions
How do I tell the difference between over-proofed and under-proofed bread from the crumb? Under-proofed crumb is uniformly dense and tight, often with one or two large irregular holes (fool's crumb). The cell walls are thick. Over-proofed crumb shows large tunnels or caves near the top crust, collapsed areas, and a dense band at the bottom. The overall profile is flat and wide. Properly proofed crumb has an even gradient of hole sizes with thin, translucent cell walls throughout.
Is the poke test reliable? The poke test is reliable on room-temperature dough but misleading on cold-retarded dough. On room-temperature dough, a slow spring-back with a slight remaining indent indicates proper proofing. On cold dough, the firmer texture mimics under-proofing regardless of actual fermentation level. Use the aliquot jar or volume tracking for objective measurement, and reserve the poke test as a secondary confirmation.
What does the fool's crumb look like, and why does it happen? The fool's crumb appears as one or two large, dramatic air pockets in an otherwise dense, tight loaf. It happens because under-proofed dough does not have a relaxed gluten network to distribute gas evenly. The small amount of gas that exists coalesces into a few large pockets. It is often mistaken for open crumb, but a true open crumb shows evenly distributed holes of varying sizes with thin cell walls — not isolated caves in a dense matrix.
Can I fix over-proofed dough by adding more flour and re-kneading? No. Adding flour and re-kneading does not reverse the acid damage to gluten or replace the consumed sugars. It creates a stiff, overworked dough with degraded structure and the flavor problems of over-fermentation. If the dough is severely over-proofed, repurpose it as focaccia or flatbread rather than trying to rescue a traditional loaf shape.
My dough looks perfect during bulk but the bread is under-proofed. What is going wrong? This usually means the final proof was too short or too cold. If you are cold retarding, the dough may need a longer retard — try 16-24 hours instead of 8-12. Alternatively, your bulk endpoint may be too conservative for your cold retard conditions. Push bulk a bit further (aim for 60-75% rise instead of 50%) so the dough enters the fridge with more fermentation already completed.
How long should the final proof be in the fridge? For most sourdough at typical refrigerator temperatures (3-5 °C), 12-18 hours is the sweet spot. Some bakers successfully retard for up to 36 hours for deeper tang. The warmer the dough was during bulk, the shorter the cold retard can be. A dough that entered the fridge at 26 °C has significant momentum and may be fully proofed after 10-12 hours. A dough that entered at 20 °C has less momentum and benefits from 16-24 hours.
Does the starter percentage affect proofing speed? Significantly. Higher starter percentages (15-20%) mean more yeast and bacteria from the start, which accelerates fermentation. Lower percentages (5-8%) slow things down. In warm weather, reducing starter percentage is one of the most effective ways to widen your proofing window and reduce the risk of over-proofing.
Why does my bread over-proof in summer but work perfectly in winter? Fermentation rate roughly doubles with every 10 °C increase in temperature. If your kitchen is 28 °C in summer versus 20 °C in winter, fermentation runs nearly twice as fast. Adjust by reducing starter percentage, using colder water, and ending bulk at a lower rise percentage in warm weather. Tracking your kitchen temperature with a thermometer makes seasonal adjustments straightforward.
What is the aliquot jar method and how accurate is it? The aliquot jar is a small sample of your dough (about 30 g) placed in a clear jar at the same temperature as your bulk dough. You track its rise to monitor fermentation objectively. It is the most accurate home method available because it measures actual volume increase rather than relying on subjective feel or visual cues. The only limitation is that it does not receive stretch and folds, so it may lag slightly behind the main dough in early bulk.
Can I over-proof during cold retard in the fridge? Yes, though it takes longer. At typical fridge temperatures (3-5 °C), fermentation slows dramatically but does not stop entirely. Dough retarded for 48+ hours — especially dough that entered the fridge warm or with high starter percentage — can over-proof. Signs include a very sour smell when you open the fridge, visible collapse in the banneton, and dough that feels very soft and slack. For most recipes, 12-24 hours of cold retard is safe.
My dough always seems to be between stages — not clearly under or over-proofed. Is that normal? Yes. Perfect proofing is a range, not a single point. Dough that is "a bit under" will still produce good bread — slightly denser, with more oven spring. Dough that is "a bit over" will still produce good bread — slightly flatter, with more sour flavor. The disaster zone at either extreme is narrower than most bakers think. As long as you are roughly in the right range, you will get bread worth eating.
Should I proof at room temperature or in the fridge? Both work, and they produce different results. Room-temperature proofing (2-4 hours at 22-26 °C) gives you a milder, more lactic flavor profile and requires close attention to timing. Cold retarding (12-24 hours at 3-5 °C) develops more acetic tang, fits a convenient overnight schedule, and produces cold dough that scores cleanly and springs well in the oven. Most experienced home bakers use cold retard for its flavor and scheduling advantages.
How do I know when to stop bulk fermentation if I am doing a same-day bake with no cold retard? For a same-day bake, push bulk further — to 75-100% rise — because there is no cold retard phase to continue fermentation. After shaping, proof at room temperature for 1-3 hours (depending on temperature) until the poke test shows a slow spring-back. The dough should feel pillowy and slightly jiggly. Bake immediately when it is ready — same-day bakes have a tighter window than cold-retard bakes.