In this article
- Mistake 1: Measuring Ingredients by Volume Instead of Weight
- Why It Is a Problem
- How to Fix It
- Mistake 2: Using the Wrong Flour Without Checking Protein Content
- Why It Is a Problem
- How to Fix It
- Mistake 3: Killing Your Starter with Hot Water
- Why It Is a Problem
- How to Fix It
- Mistake 4: Using a Starter That Is Not Active Enough
- Why It Is a Problem
- How to Fix It
- Mistake 5: Not Preheating the Oven Long Enough
- Why It Is a Problem
- How to Fix It
- Mistake 6: Opening the Oven Door During the First 20 Minutes
- Why It Is a Problem
- How to Fix It
- Mistake 7: Not Covering Dough During Proofing
- Why It Is a Problem
- How to Fix It
- Mistake 8: Cutting Into Bread Before It Has Cooled
- Why It Is a Problem
- How to Fix It
- Mistake 9: Over-Fermenting the Dough (Especially in Warm Weather)
- Why It Is a Problem
- How to Fix It
- Mistake 10: Under-Fermenting the Dough
- Why It Is a Problem
- How to Fix It
- The Mistakes Ranked by Impact
- A Quick-Reference Troubleshooting Chart
- The Common Thread: Observation Over Recipe
- Frequently Asked Questions
10 Beginner Sourdough Mistakes and Fixes
Fix the 10 most common beginner sourdough mistakes, from measuring by volume to underproofing, weak starter, steam, and slicing too early.
Every sourdough baker makes mistakes in the beginning. That is not a character flaw — it is a natural part of learning a craft that involves living organisms, variable ingredients, and a process that depends on conditions in your specific kitchen on a specific day. The difference between bakers who improve quickly and those who stay frustrated is not talent. It is diagnosis. Once you know what went wrong and why, you can fix it on the very next bake.
This guide covers the ten most common mistakes that beginners make. Not vague "tips" — specific errors with specific causes and specific fixes. Each one is grounded in the science of what is actually happening in your dough, so you understand the why, not just the what.
If you have baked three loaves and they all came out dense, flat, or gummy — you are in the right place. At least one of these ten mistakes is almost certainly the cause, and the fix is probably simpler than you think.
Mistake 1: Measuring Ingredients by Volume Instead of Weight
This is the single most impactful mistake a beginner can make, and it is so fundamental that every other technique becomes unreliable until it is fixed.
Why It Is a Problem
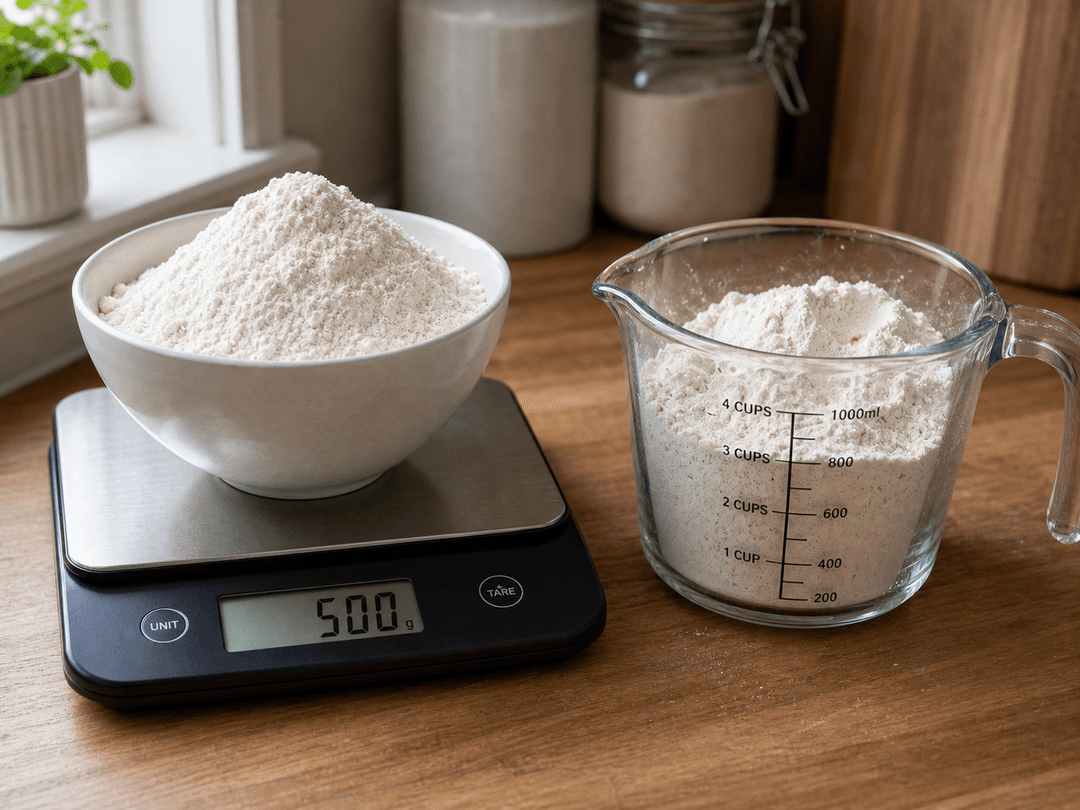
A cup of flour can weigh anywhere from 120 g to 160 g depending on how you scoop it, whether the flour was sifted, how compacted it is in the bag, and even the humidity in your kitchen. That is a 33% variance — in the most important ingredient in your bread.
In a typical sourdough recipe calling for 500 g of flour, a 33% measurement error means you might use anywhere from 400 g to 665 g. At the low end, your dough is a sticky, unmanageable puddle. At the high end, it is a stiff, dry ball. Both will produce terrible bread, and you will blame the recipe, the technique, or yourself — when the real problem was the measuring cup.
Baker's percentages — the universal language of bread formulas — are based entirely on weight. When a recipe says 72% hydration, it means 72 g of water for every 100 g of flour. This precision is what makes recipes reproducible. Volume measurements destroy that precision completely.
How to Fix It
Buy a digital kitchen scale. It does not need to be expensive — a basic model that reads in grams with 1 g precision costs under 20 euros and will last years. Weigh every ingredient: flour, water, salt, starter.
A scale transforms your baking from guesswork into a system. You can reproduce a recipe exactly. You can adjust hydration by 2% and observe the difference. You can troubleshoot meaningfully because you know precisely what went into the dough.
From this point forward, every piece of advice in this guide assumes you are weighing your ingredients. If you are still using cups, fixing that one thing will improve your bread more than any technique change.
Mistake 2: Using the Wrong Flour Without Checking Protein Content
Not all flour is created equal, and the label matters more than most beginners realize.
Why It Is a Problem
Bread flour and all-purpose flour are not interchangeable in sourdough baking. The critical difference is protein content, which determines how much gluten the flour can form. More gluten means a stronger, more extensible dough that can trap gas and rise properly.
For bread that rises well and holds its shape, you need flour with at least 10.5% protein. Many all-purpose flours fall below this threshold — some as low as 8–9%. Using low-protein flour in a sourdough recipe designed for bread flour produces a weak, slack dough that cannot hold gas. The loaf spreads flat, the crumb is dense, and the oven spring is minimal.
In Austria and Germany, flour types are identified by mineral content (Type numbers like W480, W700, Type 405, Type 550) rather than protein content. Austrian W700 bread flour typically has 10.5–11.5% protein and works well for standard sourdough. German Type 550 is a similar all-purpose flour. But these numbers describe mineral content, not protein — so you still need to check the nutrition label for actual protein percentage.
How to Fix It
Read the nutrition label on your flour bag. Look for protein content per 100 g. For sourdough bread:
- 10.5% or higher: Suitable for bread. Will form adequate gluten.
- 11.5–13%: Ideal range for sourdough. Strong gluten development, good oven spring, open crumb potential.
- Below 10%: Not ideal for bread. Better for cakes, pastries, or cookies.
If your local flour is on the low end of protein, you can blend it with a higher-protein flour, or add vital wheat gluten (1–2 tablespoons per 500 g flour) to boost strength. But the simplest fix is to buy flour specifically labeled as bread flour or strong flour.
Mistake 3: Killing Your Starter with Hot Water
Your sourdough starter is a living ecosystem of wild yeast and bacteria. And like all living organisms, it has temperature limits.
Why It Is a Problem
The wild yeast in sourdough — primarily Kazachstania humilis — dies at temperatures above 48 °C (120 °F). The lactic acid bacteria die at slightly higher temperatures but are severely stressed above 50 °C (122 °F). Hot tap water in many homes reaches 55–60 °C, and water from a kettle that has been boiling is obviously lethal.
If you feed your starter with water that is too hot, you kill the organisms that make it work. The starter may still bubble briefly (from residual gas or surviving bacteria) but it will not ferment dough effectively. A baker who uses hot water to feed their starter and then wonders why their bread does not rise is experiencing exactly this problem.
How to Fix It
Feed your starter with water at 24–27 °C (74–80 °F) — comfortably warm to the touch, but not hot. If you do not have a thermometer, the classic test works: the water should feel like a warm bath, not like shower water that makes you flinch.
In winter, when tap water runs cold, let it sit at room temperature for 30 minutes before using it, or mix cold and hot water and test with a thermometer. In summer, straight tap water is usually fine.
The safe range is wide: Anything between 20 °C and 35 °C (68–95 °F) will sustain your starter. Just stay well below 48 °C, and you will never have this problem.
If you suspect you accidentally killed your starter with hot water, feed it normally with lukewarm water for 2–3 days. If any yeast survived, the population will recover. If the starter refuses to rise after several feedings at the correct temperature, you may need to start a new one.
Mistake 4: Using a Starter That Is Not Active Enough
A starter that exists is not the same as a starter that is ready to bake with. The difference is activity — and it is the second most common cause of dense bread, after under-fermentation.
Why It Is a Problem
Your starter needs to be at or near its peak of activity when you add it to your dough. At peak, the yeast population is at its highest, gas production is at its maximum, and the starter has the metabolic momentum to ferment a full batch of dough.
A starter that has been sitting in the fridge for two weeks has dormant yeast and sluggish bacteria. Using it directly in a recipe is like asking a sleeping athlete to run a marathon without warming up. The dough will ferment — eventually — but much more slowly than the recipe expects. By the time you shape and bake at the recipe's suggested timing, the dough is severely under-fermented.
How to Fix It
Activate your starter with 2–3 feedings before bake day. If it has been refrigerated, take it out 24–48 hours before you plan to bake. Feed it once and let it rise and peak at room temperature. Feed it again. By the second or third feeding, it should reliably double in volume within 4–6 hours at 24–26 °C.
The float test is a quick supplementary check: drop a small spoonful of starter into a glass of water. If it floats, it is active and gas-filled. If it sinks, it needs more time or another feeding. The float test is not perfect — very wet starters can float even when under-active — but it is a useful secondary indicator alongside visual doubling.
The best indicator is predictable doubling. If your starter consistently doubles within 5–8 hours of feeding at room temperature, it is ready to bake with. If it takes 12+ hours or does not double at all, it needs more feedings to rebuild its microbial population.
Adding a small amount of whole rye or whole wheat flour to your feeding can jumpstart recovery — the extra minerals and microorganisms in whole grain flour give the culture a boost.
Mistake 5: Not Preheating the Oven Long Enough
This seems like a minor point, but it has a major impact on oven spring and crust quality.
Why It Is a Problem
Most home ovens display the target temperature on their panel long before they have actually reached that temperature throughout the oven cavity. The thermostat triggers when the air near the sensor hits the target, but the walls, floor, racks, and any baking vessel inside have not yet absorbed enough heat to be at temperature.
Many home ovens are also 15–25 °C (25–50 °F) off from what they display. An oven set to 245 °C might actually be at 220 °C — and that difference matters enormously for oven spring.
If you load your bread into a Dutch oven that is not fully preheated, the dough does not receive the immediate, intense blast of heat it needs for maximum oven spring. The result: less rise, a thicker crust that sets too soon, and a denser crumb.
How to Fix It
Preheat for at least 45 minutes, ideally 60 minutes, with the Dutch oven (or baking stone) inside. This ensures that every thermal mass in the oven — the walls, the racks, the baking vessel — has reached the target temperature. The air heats quickly, but cast iron and ceramic take much longer.
Use an oven thermometer. Place one on the middle rack and compare its reading to the oven's display. If there is a discrepancy, adjust your oven setting accordingly. A 25-euro oven thermometer eliminates one of the most common and frustrating sources of inconsistency in home baking.
Set the temperature 10–15 °C higher than your target for the first 20 minutes if your oven runs cool, then reduce to the correct temperature after you have achieved the initial oven spring.
Mistake 6: Opening the Oven Door During the First 20 Minutes
This mistake destroys steam, and steam is what makes the difference between a beautiful, blistered crust and a dull, thick shell.
Why It Is a Problem
During the first 15–20 minutes of baking, steam in the oven keeps the dough's surface moist and pliable. This allows the dough to expand freely during oven spring — the rapid rise driven by gas expansion and yeast activity in the heat. The moist surface stretches, the score opens, the ear lifts, and the loaf achieves its full height.
When you open the oven door, you release the trapped steam instantly. The dry air that rushes in causes the dough's surface to dry out and set rigid within minutes. The crust hardens before oven spring is complete, trapping the remaining gas inside. The loaf cannot expand further, the score does not open fully, and the crust becomes thick and pale instead of thin and blistered.
If you are using a Dutch oven, opening the lid during the covered phase has the same effect — it releases the trapped moisture that the dough itself is generating.
How to Fix It
Do not open the oven door or the Dutch oven lid for the first 20 minutes. Period. No checking, no peeking, no adjusting.
Use the oven light to monitor the bake visually through the glass door. If you cannot see well enough, trust the process. Set a timer for 20 minutes and leave the oven completely alone.
After 20 minutes, you can safely remove the Dutch oven lid (this is the normal workflow — steam phase followed by dry browning phase) or open the oven door briefly to rotate the loaf or check color. At this point, oven spring is complete and the crust has set enough that steam loss no longer affects the rise.
Mistake 7: Not Covering Dough During Proofing
This is a small habit with outsized consequences for dough quality.
Why It Is a Problem
Exposed dough loses moisture from its surface. Within 30–60 minutes of uncovered proofing, the top of the dough develops a dry skin. This skin does not behave like the rest of the dough — it cannot stretch, it resists expansion, and it creates an uneven surface that tears unpredictably during baking.
A dried-out surface also affects scoring. The blade drags through the leathery skin rather than cutting cleanly, producing ragged lines that do not open properly. And during baking, the dry surface sets faster than the rest of the crust, creating an uneven texture.
This applies during bulk fermentation, bench rest, and final proofing (if done at room temperature rather than in the fridge). Any time the dough is sitting exposed to air, it is losing moisture.
How to Fix It
Cover your dough at every resting stage:
- During bulk fermentation: Use a lid on your container, a damp tea towel, plastic wrap, or a reusable silicone lid. The container should not be airtight (the dough produces gas that needs somewhere to go), but the surface should be protected from air exposure.
- During bench rest: Invert a bowl over the pre-shaped dough round, or drape a damp towel over it. Even 15 minutes of exposure in a dry kitchen can create a noticeable skin.
- During room-temperature proofing: Cover the banneton or bowl with plastic wrap, a damp towel, or a shower cap. If using a banneton, a plastic bag pulled over the top works well.
- During cold retard: The fridge is a dehumidifying environment. Cover the banneton tightly with plastic wrap or place it inside a sealed plastic bag.
The effort is minimal — a few seconds to cover and uncover — but it eliminates a common source of surface problems.
Mistake 8: Cutting Into Bread Before It Has Cooled
This is the hardest mistake to fix, because the bread smells incredible straight from the oven and every instinct says to slice into it immediately. But cutting too early genuinely damages the bread.
Why It Is a Problem
When bread comes out of the oven, it is not finished baking in the strictest sense. The internal temperature is 96–99 °C (205–210 °F), and the crumb is still in a semi-liquid, gelatinized state. Over the next 1–4 hours as the bread cools, a process called starch retrogradation occurs: the starch molecules that gelatinized during baking re-crystallize into a stable, firm structure. This is what transforms the interior from a sticky gel into a sliceable crumb.
If you cut the bread before retrogradation is complete:
- The crumb is gummy. The starch has not yet set, and the interior feels wet and doughy even though the bread is fully baked.
- The crumb compresses. The knife squashes the soft structure, permanently deforming the holes. You will never see the true crumb structure.
- Steam escapes from the interior. The moisture that should have been slowly redistributing through the crumb during cooling instead escapes as visible steam through the cut surface. The bread dries out faster.
- The crust softens. The escaping moisture migrates to the crust, turning it from crispy to chewy.
How to Fix It
Wait. There is no shortcut.
- Small rolls and baguettes: 30–45 minutes
- Standard boules and batards (750 g–1 kg): 1.5–2 hours minimum
- Large boules (1 kg+): 2–4 hours
Place the bread on a wire rack immediately after removing it from the oven. The wire rack allows air circulation underneath, preventing the bottom crust from becoming soggy from trapped steam.
You can hear the crust crackling as it cools — this is the moisture redistributing and the crust contracting. When the crackling stops and the loaf feels room temperature to the touch, it is safe to slice.
If you absolutely cannot wait, tear rather than slice. Tearing does not compress the crumb the way a knife does, and it allows the bread to separate along its natural structure. But even tearing should wait at least 30 minutes for a standard loaf.
Mistake 9: Over-Fermenting the Dough (Especially in Warm Weather)
Over-fermentation is the opposite of the more common under-fermentation, but it is just as destructive — and much more common in summer or in warm kitchens.
Why It Is a Problem
When dough ferments too long or at too high a temperature, two damaging things happen simultaneously:
- Yeast exhausts its food supply. All the simple sugars have been consumed. When you bake the bread, there are no residual sugars left on the surface to caramelize — resulting in a pale, bland crust.
- Protease enzymes degrade gluten. The longer fermentation runs, the more protease activity breaks down the gluten network that holds the dough together. Eventually, the dough loses its ability to hold gas. It becomes slack, sticky, almost liquid. It pours out of the container rather than holding shape.
Over-fermented dough produces flat loaves that spread sideways in the oven, have dense and gummy interiors despite having produced plenty of gas during fermentation, and taste excessively sour with an acetone or nail-polish-remover undertone.
Temperature is the accelerator. At 22 °C, you might have a comfortable 5-hour bulk window. At 28 °C — which is common in kitchens during summer — the same dough over-ferments in 3 hours. A recipe that works perfectly in your cool autumn kitchen can fail dramatically in July without any change in technique.
How to Fix It
In warm weather (above 26 °C):
- Reduce your starter percentage. Drop from 10% to 3–5% of flour weight. Less starter means fewer yeast and bacteria, which slows the entire process.
- Use cold water. Calculate your desired dough temperature (24–26 °C) and use ice-cold water to get there. In a 30 °C kitchen, this might mean water at 5–8 °C.
- Shorten bulk fermentation. At high temperatures, shape when the dough has risen only 30–40% (instead of the usual 50–75%), because fermentation will continue aggressively through shaping and cold retard.
- Cold retard immediately after shaping. Get the dough into the fridge as quickly as possible to arrest fermentation.
- Mix early in the morning when the kitchen is coolest.
The aliquot jar is your best defense. A small sample of dough in a clear jar with a marked starting level lets you track fermentation objectively. When you see 30–40% rise in a warm kitchen, it is time to shape — do not wait for the 4-hour mark that the recipe suggests.
Mistake 10: Under-Fermenting the Dough
This is the most common mistake in sourdough baking. Period. It causes more dense, disappointing loaves than every other problem on this list combined.
Why It Is a Problem
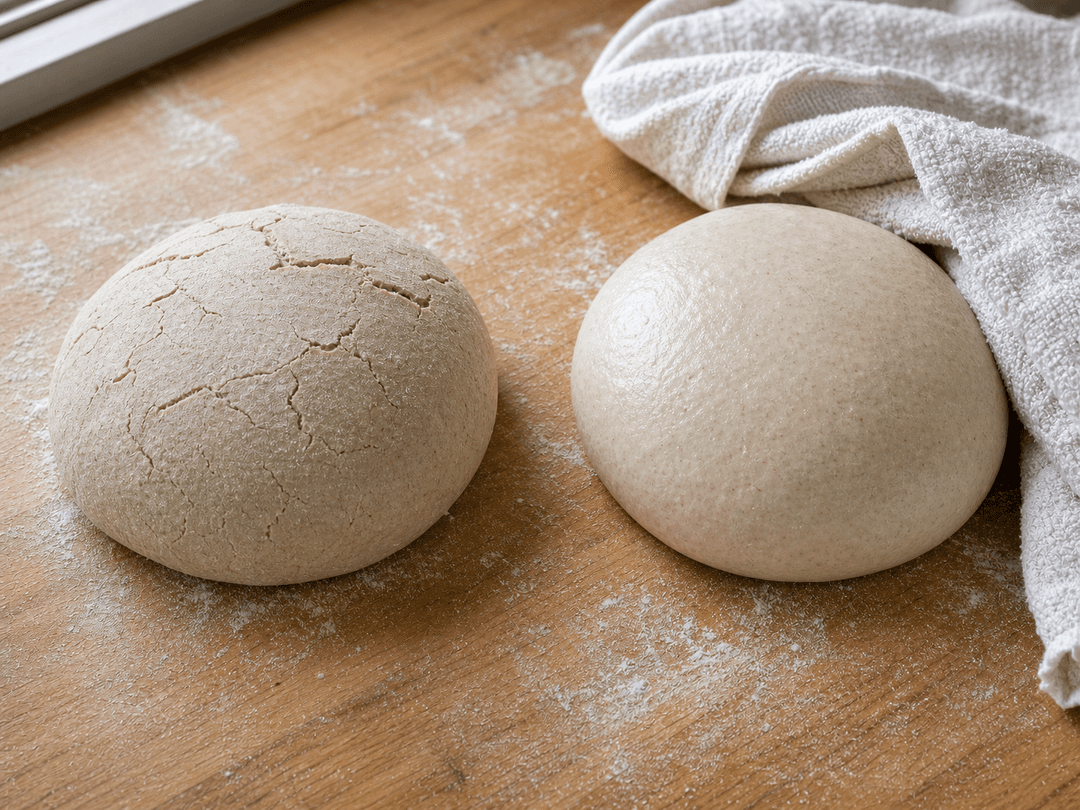
Under-fermentation means the dough has not produced enough gas and the gluten network has not been sufficiently stretched and conditioned by fermentation. The result is bread that is dense, heavy, and closed — with a hard crust, a gummy interior, bland flavor, and either no holes or the characteristic "fool's crumb" (one or two large, random holes in an otherwise tight crumb).
The reason under-fermentation is so common among beginners is that most recipes specify bulk fermentation time rather than dough readiness. A recipe that says "bulk for 4 hours" was written in the author's kitchen at the author's room temperature with the author's starter. If your kitchen is cooler, your starter is less active, or your flour absorbs water differently, 4 hours is not enough.
Following time instead of dough is the root cause of under-fermentation. Until you learn to read your dough — by volume rise, texture, and feel — you will always be guessing, and guessing usually means stopping too early because the dough "looks close enough."
How to Fix It
Extend bulk fermentation until the dough tells you it is ready. Here is what ready looks like:
- The aliquot jar shows 50–75% rise (at 24–26 °C dough temperature). Adjust this target based on temperature: at 28 °C, shape at 30–40%; at 20 °C, push to 75–100%.
- The dough is domed and puffy in its container, not flat.
- Visible bubbles on the surface and along the sides of a clear container.
- The dough jiggles when you gently shake the container — like firm gelatin, not like liquid.
- The poke test responds slowly: Press a floured finger 1 cm into the surface. The dough should spring back slowly, leaving a slight indent. Immediate snapback means more time is needed. No snapback means you have gone too far.
Maintain a dough temperature of 24–26 °C (75–78 °F). This is the most reliable fermentation range. Use the DDT (Desired Dough Temperature) formula to calculate your water temperature: Water temp = (Target FDT x 3) - (flour temp + room temp + starter temp).
Confirm your starter is active. Before blaming fermentation timing, make sure your starter reliably doubles within 4–6 hours of feeding at room temperature. If it does not, it needs 2–3 feedings over 24–48 hours to rebuild its microbial population.
Use a clear container for bulk fermentation. A straight-sided, clear tub or jar lets you see exactly how much the dough has risen. Mark the starting level with a rubber band. Watch the dough, not the clock.
The Mistakes Ranked by Impact
Not all mistakes are equally damaging. Here is how they rank in terms of their effect on the final bread:
| Rank | Mistake | Impact level | How often beginners make it |
|---|---|---|---|
| 1 | Under-fermentation (#10) | Catastrophic — dense, gummy, flat bread | Almost universal |
| 2 | Measuring by volume (#1) | Severe — makes everything unreliable | Very common |
| 3 | Inactive starter (#4) | Severe — causes under-fermentation | Very common |
| 4 | Over-fermentation (#9) | Severe — flat, pale, gummy bread | Common in summer |
| 5 | Wrong flour (#2) | Moderate to severe — weak dough | Common |
| 6 | Hot water killing starter (#3) | Severe when it happens — but easy to avoid | Occasional |
| 7 | Insufficient preheating (#5) | Moderate — reduced oven spring | Common |
| 8 | Opening oven door (#6) | Moderate — lost steam and oven spring | Common |
| 9 | Cutting bread early (#8) | Moderate — gummy crumb perception | Very common |
| 10 | Not covering dough (#7) | Minor to moderate — surface issues | Common |
If you fix only three things, fix these: Use a scale (#1), make sure your starter is active (#4), and extend your bulk fermentation (#10). These three changes alone will transform your bread.
A Quick-Reference Troubleshooting Chart
Here is a diagnostic chart that connects common bread problems to their most likely causes among these ten mistakes:
| Problem | Most likely mistake | Second most likely | Fix |
|---|---|---|---|
| Dense, heavy loaf | Under-fermentation (#10) | Inactive starter (#4) | Extend bulk; activate starter |
| Flat loaf that spreads | Over-fermentation (#9) or under-fermentation (#10) | Wrong flour (#2) | Track volume rise; check protein content |
| Gummy interior | Under-fermentation (#10) or cutting too early (#8) | Insufficient bake time | Extend bulk; wait 2+ hours to cut |
| Pale, dull crust | Over-fermentation (#9) | Insufficient preheating (#5) | Reduce bulk time in warm weather; preheat longer |
| Score does not open | Under-fermentation (#10) | Opening oven door (#6) | More gas = more oven spring; keep door closed |
| Thick, hard crust | Under-fermentation (#10) | Opening oven door (#6) | Better fermentation; proper steam |
| Inconsistent results | Measuring by volume (#1) | Temperature variation | Buy a scale; track dough temp |
| Starter does not rise dough | Hot water (#3) or inactive starter (#4) | — | Check water temp; feed starter 2–3x before bake |
| Surface tears and cracks | Not covering dough (#7) | Under-fermentation (#10) | Cover at every stage; extend bulk |
| Excessively sour | Over-fermentation (#9) | — | Reduce starter %; shorter bulk; warmer fermentation |
The Common Thread: Observation Over Recipe
All ten of these mistakes share a common thread: they happen when bakers follow instructions mechanically instead of observing what is actually happening in front of them. Bread baking is an observational craft. The recipe is a guideline, not a script. Your kitchen, your flour, your water, your ambient temperature, and your starter are all unique — and the only way to account for those variables is to watch, touch, smell, and learn from each bake.
The most effective improvement a beginner can make is to keep a simple baking journal. For each bake, note: the ambient temperature, the starter's peak time, the Final Dough Temperature, the bulk fermentation time and rise percentage, the cold retard duration, and the result (photos of the crumb are especially helpful). After three to five bakes, patterns emerge. After ten, you will understand your kitchen and your process well enough to adapt any recipe confidently.
Frequently Asked Questions
What is the single most important thing I can do to improve my sourdough? Use a digital kitchen scale and weigh every ingredient in grams. This one change makes every recipe reproducible and every troubleshooting step meaningful. Without accurate measurement, you are building on sand — nothing else you adjust can be trusted.
How do I know if my starter is ready to bake with? Your starter should reliably double in volume within 4–6 hours of feeding at room temperature (24–26 °C). If it has been refrigerated, give it 2–3 room-temperature feedings over 24–48 hours before baking. The float test (dropping a spoonful into water — it should float) is a quick supplementary check but not definitive on its own.
Why is my sourdough always dense in the middle? The most common cause is under-fermentation. The dough did not produce enough gas during bulk fermentation, so the crumb is tight and heavy. Extend your bulk until the dough has risen 50–75% by volume (use an aliquot jar or clear container to track this). The second most common cause is cutting the bread before it has fully cooled — the interior appears gummy because starch retrogradation is not complete.
My sourdough is dense even though I fermented for 5 hours. What is wrong? Time is not a reliable indicator of fermentation. If your kitchen is cool (20 °C or below), 5 hours may not be enough. If your starter was sluggish, fermentation started slowly. Always judge fermentation by dough behavior (volume rise, bubbles, jiggle, poke test) rather than by the clock. Maintaining a dough temperature of 24–26 °C and using an active starter are the two most important factors.
Can I use all-purpose flour for sourdough? You can, but the results will be weaker. All-purpose flour typically has 9–11% protein, compared to 11–13% for bread flour. The lower protein means less gluten, which means a weaker dough that cannot hold gas as well. Your bread will tend toward a flatter shape and denser crumb. For best results, use flour with at least 10.5% protein. If you must use all-purpose, consider adding 1–2 tablespoons of vital wheat gluten per 500 g flour.
What temperature should the water be when I feed my starter? 24–27 °C (74–80 °F) — comfortably warm but not hot. The yeast in your starter dies above 48 °C (120 °F), and the bacteria are stressed above 50 °C (122 °F). If in doubt, err cooler. Anything between 20 °C and 35 °C is safe. Never use water straight from a kettle or hot tap.
How long should I preheat my oven for sourdough? At least 45 minutes, ideally 60 minutes, with the Dutch oven or baking stone inside. The oven display may show the target temperature after 15 minutes, but the actual thermal mass (walls, racks, baking vessel) takes much longer to reach true temperature. An oven thermometer placed on the middle rack will show you when the temperature has genuinely stabilized.
Why does my sourdough work in winter but fail in summer? Temperature is the primary variable in sourdough baking. Your kitchen at 28 °C in summer ferments dough roughly twice as fast as at 22 °C in winter. A recipe that calls for 4–5 hours of bulk at 22 °C may over-ferment in just 2.5–3 hours at 28 °C. The fix: reduce starter percentage to 3–5%, use ice-cold water, shorten bulk, and cold retard immediately after shaping.
How do I know when bulk fermentation is done? Look for a combination of signs: the dough has risen 50–75% from its starting volume (at 24–26 °C), the surface is domed and covered with small bubbles, the dough jiggles like gelatin when you move the container, and it feels noticeably lighter and more airy than at the start. An aliquot jar — a small sample of dough in a clear jar with a marked starting level — is the most objective way to track volume rise.
Why does my bread have one huge hole and dense crumb everywhere else? This is called "fool's crumb" and it is a classic sign of under-fermentation. The limited gas that was produced during bulk migrated to a single weak point in the dough's structure rather than distributing evenly throughout a well-developed gluten network. The fix is to extend bulk fermentation so the gas distributes more evenly. This is not a shaping or scoring problem — it is a fermentation problem.
Should I use a Dutch oven for sourdough? A Dutch oven (or cast-iron combo cooker) is the most reliable way to bake sourdough at home. It traps steam from the dough itself during the first 20 minutes, keeping the crust pliable so oven spring can lift the loaf and open the score. After 20 minutes, you remove the lid for the browning phase. If you do not have a Dutch oven, you can use alternative steam methods (lava rocks, ice cubes, a towel with boiling water), but none are as reliable.
How do I fix a flat sourdough loaf? Flat loaves are usually caused by one of three things: (1) under-fermentation — extend your bulk until the dough has properly risen, (2) over-fermentation — the gluten has degraded and cannot hold the loaf's shape, or (3) weak flour with insufficient protein. Check each in order. Under-fermentation is by far the most common cause. Track your dough's volume rise with an aliquot jar and make sure you are using flour with at least 10.5% protein.
Is it okay to refrigerate my starter instead of feeding it daily? Yes. If you do not bake frequently, store your starter in the fridge and feed it once a week. Before baking, take it out 24–48 hours in advance and give it 2–3 feedings at room temperature to reactivate. A refrigerated starter is dormant but alive — it just needs a warmup period before it can leaven bread effectively.
Why does my bread taste bland even though it looks fine? Bland flavor usually means under-fermentation or insufficient acid development. The lactic acid bacteria in your starter need time to produce the acids that give sourdough its characteristic tang. Solutions: extend bulk fermentation, try a longer cold retard (18–24 hours rather than 12), or use a slightly higher starter percentage. A warm bulk (24–26 °C) followed by a long cold retard produces the best flavor balance.
What is the biggest mistake beginners make with sourdough? Under-fermentation — by a wide margin. Most beginners follow recipe timing rather than reading their dough, and they end bulk fermentation too early because the recipe says a certain number of hours. Temperature, starter activity, flour type, and hydration all affect how long bulk actually needs to run. Learn to judge fermentation by volume rise, texture, and visual cues rather than by the clock, and your bread will improve immediately.
How long does sourdough bread stay fresh? A well-made sourdough loaf stays fresh for 3–5 days at room temperature, stored in a cloth bag or bread box. Do not refrigerate — cold accelerates staling by speeding up starch retrogradation. For longer storage, slice the bread and freeze it. Frozen slices can be toasted directly from the freezer with excellent results.