In this article
- Why Steam Matters: The Science
- 1. Delays Crust Formation (Enables Oven Spring)
- 2. Promotes Starch Gelatinization (Creates Shine)
- 3. Enhances Browning (Maillard and Caramelization)
- Two-Stage Baking: The Framework
- Phase 1: With Steam (First 20 Minutes)
- Phase 2: Without Steam (Next 20-25 Minutes)
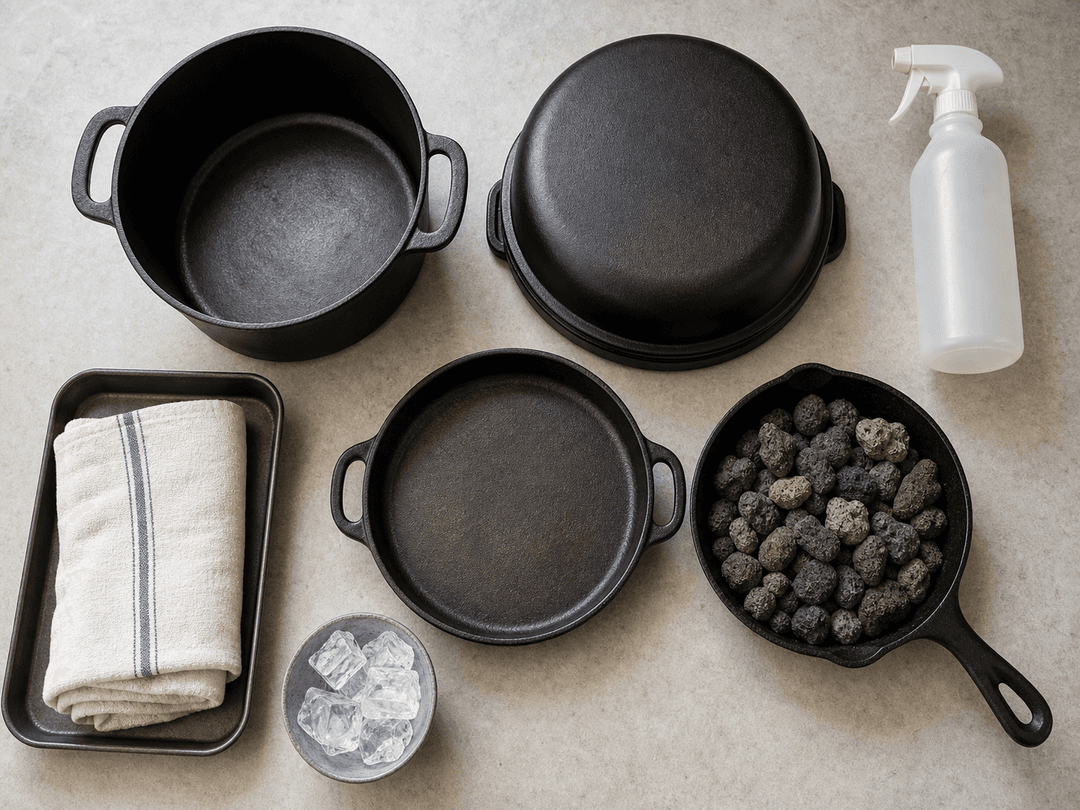
- Method 1: Dutch Oven (Most Reliable)
- How It Works
- Step-by-Step Instructions
- Pros
- Cons
- Tips for Better Results
- Method 2: Combo Cooker (Easier Loading)
- How It Works
- Step-by-Step Instructions
- Pros
- Cons
- Method 3: Lava Rocks in a Cast-Iron Pan (Best DIY Steam)
- How It Works
- Step-by-Step Instructions
- Pros
- Cons
- Safety Note
- Method 4: Towel Method (Moderate Steam)
- How It Works
- Step-by-Step Instructions
- Pros
- Cons
- Method 5: Ice Cubes (Quick Burst)
- How It Works
- Step-by-Step Instructions
- Pros
- Cons
- Method 6: Spray Bottle (Least Effective)
- How It Works
- Why It Doesn't Work Well
- When It Might Make Sense
- Method Comparison Summary
- Troubleshooting Steam Issues
- Problem: Good oven spring but pale, soft crust
- Problem: Minimal oven spring despite good steam
- Problem: Score doesn't open cleanly
- Problem: Bottom of the loaf is burnt
- Problem: Crust is thick and chewy instead of thin and crisp
- Problem: Dutch oven handle melted or knob broke
- Advanced Techniques
- Baking on a Steel with Dutch Oven Steam
- Extending Steam for Higher-Hydration Doughs
- The Post-Bake Cool-Down
- Frequently Asked Questions
Steam Bread Baking in a Home Oven
Compare Dutch oven and DIY steam methods for home bread baking, with timing, crust science, oven spring tips, and common mistakes.
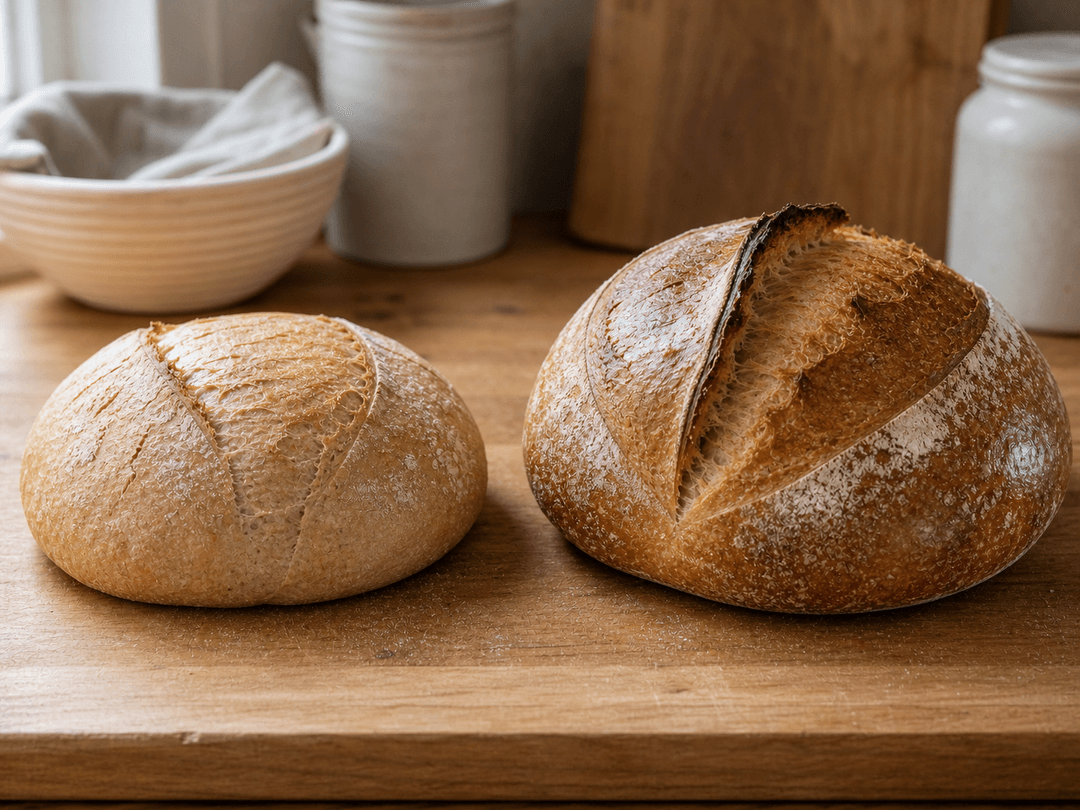
Steam is the invisible ingredient in great bread. Without it, your sourdough will emerge from the oven with a thick, pale crust, minimal oven spring, and a closed score that never bloomed. With it, the same dough — same recipe, same fermentation, same shaping — produces a tall, dramatically risen loaf with a shiny, crackling crust and an ear that curls back to reveal the interior.
Professional bakeries inject steam directly into the oven chamber through dedicated nozzles. Home bakers do not have that luxury, but they have something remarkably effective: a preheated Dutch oven that traps the dough's own moisture and creates a miniature steam environment. And for those without a Dutch oven, several DIY alternatives produce surprisingly good results.
This guide compares every practical steam method available to home bakers — what each one does, how to execute it, and which situations each method handles best.
Why Steam Matters: The Science
Steam during the first 15-20 minutes of baking does three critical things, and understanding them explains why steam is non-negotiable for great sourdough.
1. Delays Crust Formation (Enables Oven Spring)
When cold dough enters a hot oven, the yeast has a final burst of activity before the internal temperature kills it — typically at around 60 °C (140 °F). This last gasp of gas production, combined with the expansion of existing CO2 and the conversion of water to steam inside the dough, drives oven spring: the dramatic rise that happens in the first 10-15 minutes of baking.
But oven spring can only happen if the outer surface of the dough remains pliable. If the crust sets hard before the interior has finished expanding, the dough is trapped. The gas has nowhere to go, the expansion force pushes sideways instead of upward, and the result is a flat, dense loaf.
Steam keeps the outer surface moist and pliable during this critical window. The water vapor condenses on the cool dough surface, forming a thin film that prevents the crust from hardening. This gives the dough time to expand fully before the crust locks in.
2. Promotes Starch Gelatinization (Creates Shine)
The moisture that condenses on the dough surface during steaming does something remarkable: it gelatinizes the surface starch. Starch granules absorb the water and swell, forming a smooth, glossy layer that eventually bakes into the shiny, almost lacquered crust that characterizes well-steamed bread.
Without steam, the surface starch remains dry and matte. The crust looks rough and papery rather than smooth and lustrous. This is purely an aesthetic difference — the bread tastes fine either way — but it is the hallmark that separates professional-looking loaves from home-baked ones.
3. Enhances Browning (Maillard and Caramelization)
Two chemical reactions create the deep brown color and complex flavor of a great crust:
The Maillard reaction begins at approximately 137 °C (280 °F). It is a reaction between amino acids and reducing sugars that produces hundreds of flavor compounds and the characteristic brown color of baked bread. The Maillard reaction requires a dry surface to proceed — which is why the steam must be removed after the first 15-20 minutes.
Caramelization starts at approximately 170 °C (338 °F). This is the thermal decomposition of sugars, producing additional brown color and bittersweet, toasty flavors.
Steam's role here is paradoxical: the initial moisture delays browning (which is desirable — you want oven spring before browning), but the gelatinized starch layer it creates browns more efficiently once the steam is removed. The result is a crust that is deeper brown and more flavorful than one baked without any steam at all.
Two-Stage Baking: The Framework
Regardless of which steam method you use, great sourdough follows a two-stage baking protocol:
Phase 1: With Steam (First 20 Minutes)
- Temperature: 245-260 °C (475-500 °F) — as hot as your oven goes
- Duration: 20 minutes
- Purpose: Maximum oven spring, starch gelatinization, crust plasticity
- Environment: Steam-saturated (Dutch oven lid on, or active steam source)
Phase 2: Without Steam (Next 20-25 Minutes)
- Temperature: Drop 15-25 °C (25-50 °F) from Phase 1
- Duration: 20-25 minutes, until the internal temperature reaches 96-99 °C (205-210 °F)
- Purpose: Maillard reaction, caramelization, crust setting, moisture evaporation
- Environment: Dry heat (Dutch oven lid off, or steam source removed)
The transition between phases is crucial. Removing steam (or the lid) signals the crust to begin setting and browning. Leaving steam in too long produces a pale, soft crust. Removing it too early cuts oven spring short.
Method 1: Dutch Oven (Most Reliable)
The Dutch oven is the gold standard for home bread baking, and for good reason: it creates a self-contained steam environment that rivals a professional deck oven.
How It Works
A preheated cast-iron Dutch oven (or any heavy, lidded pot) traps the moisture that evaporates from the dough itself during baking. This trapped moisture creates a humid micro-environment identical to what happens in a steam-injected bakery oven. No external water source needed — the dough provides its own steam.
Step-by-Step Instructions
-
Place the Dutch oven (with lid) in your cold oven and preheat to 245-260 °C (475-500 °F). Allow a full 45-60 minutes for the pot to absorb heat thoroughly. The thermal mass of the cast iron is what provides the initial blast of heat that drives oven spring.
-
Prepare your dough while the oven preheats. If cold-retarding, remove the banneton from the fridge, turn the dough out onto a piece of parchment paper, and score immediately. Cold dough scores cleanly and holds its shape.
-
Transfer the dough to the Dutch oven. Carefully remove the scorching-hot pot from the oven, lift the lid, and lower the dough (on parchment) into the pot. Work quickly — every second the lid is off, the pot loses heat.
-
Replace the lid and bake for 20 minutes. Do not open the lid during this time. The steam builds from the dough's own moisture.
-
Remove the lid and continue baking for 20-25 minutes. Reduce the oven temperature by 15-25 °C if desired. The crust will begin browning rapidly once the steam escapes.
-
Check doneness. The crust should be deep golden-brown to dark brown. Internal temperature should read 96-99 °C (205-210 °F). Many bakers bake darker than they think they should — a dark crust produces better flavor and crunch.
-
Cool on a wire rack for at least 1 hour before slicing. The crumb continues setting as it cools. Cutting too early produces a gummy interior.
Pros
- Most reliable steam environment available to home bakers
- No external water source required — zero risk of water damage to oven
- Consistent results once the technique is dialed in
- Works with any heavy lidded pot: enameled cast iron, bare cast iron, ceramic
- The temperature differential between cold dough and scorching pot maximizes oven spring
Cons
- Loading dough into a 260 °C pot is awkward and carries burn risk
- Limited to one loaf at a time (unless you have two pots)
- Maximum loaf size is constrained by pot diameter
- Heavy pots are difficult to handle, especially for bakers with limited strength or mobility
- Parchment paper can scorch at temperatures above 260 °C
Tips for Better Results
- Use parchment paper. It makes loading dramatically easier and prevents sticking. Trim it to slightly larger than the dough footprint — excess paper that touches the pot walls can char.
- Score quickly. The clock is ticking from the moment you open the oven. Have your lame in hand, score with confident strokes, and load within 30 seconds.
- Don't peek. Opening the lid during Phase 1 releases all the accumulated steam. Trust the process.
- Preheat longer than you think. Most ovens reach set temperature in 15-20 minutes, but the cast iron inside needs 45-60 minutes to fully saturate. This matters — a pot that looks hot but hasn't absorbed enough thermal energy will produce less oven spring.
Method 2: Combo Cooker (Easier Loading)
The Lodge combo cooker — a shallow skillet that nests with a deeper lid — is a popular alternative that solves the Dutch oven's biggest problem: loading.
How It Works
You use the shallow skillet as the base and the deeper piece as the lid. Because the base is only a few inches deep, you can slide the dough in from the side rather than lowering it into a deep, scorching pot. The deep piece inverts over the top and traps steam exactly like a Dutch oven lid.
Step-by-Step Instructions
- Preheat the combo cooker (both pieces) at 245-260 °C (475-500 °F) for 45-60 minutes.
- Remove the shallow base from the oven and place on a heat-safe surface.
- Slide the scored dough (on parchment) directly onto the shallow skillet. No lowering into a deep pot.
- Cover with the deep piece and return to the oven. Bake 20 minutes covered.
- Remove the cover and bake 20-25 minutes uncovered.
Pros
- Much easier and safer loading than a deep Dutch oven
- Same steam trapping effectiveness
- Lower center of gravity — more stable during handling
- Versatile cookware outside of bread baking
Cons
- Smaller baking surface limits loaf size
- The shallow base provides less thermal mass around the sides of the dough
- Handle on the deep piece can be awkward in smaller ovens
- Still limited to one loaf at a time
Method 3: Lava Rocks in a Cast-Iron Pan (Best DIY Steam)
For bakers who want to bake multiple loaves at once, use a baking stone or steel, or simply don't own a Dutch oven, lava rocks in a preheated cast-iron pan produce the most aggressive DIY steam.
How It Works
Lava rocks have an enormous surface area due to their porous structure. When you pour boiling water over them, the water instantly vaporizes across that massive surface, producing a dense, sustained burst of steam that lasts 10-15 minutes.
Step-by-Step Instructions
- Fill a cast-iron skillet with lava rocks (available at hardware stores for gas grills). Place the skillet on the lowest oven rack.
- Place your baking stone or steel on a middle rack. If using a stone, preheat for at least 60 minutes. Steel requires 45 minutes.
- Preheat the oven to 260 °C (500 °F) for at least 45 minutes. The lava rocks must be screaming hot.
- Load the scored dough onto the baking stone or steel.
- Immediately pour 200-250 ml (about 1 cup) of boiling water over the lava rocks. They will hiss violently and produce a dense cloud of steam. Close the oven door as quickly as possible.
- Bake with steam for 15-20 minutes. The steam dissipates naturally as the water is consumed.
- After 15-20 minutes, crack the oven door for 30 seconds to release remaining steam. Continue baking at 230-245 °C (450-475 °F) for another 20-25 minutes.
Pros
- Produces aggressive, sustained steam — closer to a bakery environment than any other DIY method
- Allows baking on a stone or steel (better heat transfer to the loaf base)
- Can bake multiple loaves simultaneously
- Lava rocks are inexpensive and last indefinitely
Cons
- Pouring boiling water in a hot oven is inherently risky — use oven mitts and stand back from the steam burst
- Can damage oven elements or interior coating over time with repeated use
- Requires a dedicated cast-iron pan you don't mind dedicating to this purpose
- More cleanup and setup than the Dutch oven method
- Less consistent than a sealed environment — steam escapes through oven vents
Safety Note
When pouring water onto scorching-hot lava rocks, the steam eruption is violent and immediate. Keep your face and arms away from the oven opening. Use a long-handled cup or funnel. Wear oven mitts on both hands. Close the oven door immediately after pouring.
Method 4: Towel Method (Moderate Steam)
The towel method is a variation of the lava rock approach that produces more gentle, sustained steam.
How It Works
A thick kitchen towel (cotton, not synthetic) is rolled up, placed in a cast-iron pan or deep baking tray, and soaked with boiling water just before loading the bread. The towel absorbs and slowly releases moisture, producing steady steam over 15-20 minutes.
Step-by-Step Instructions
- Roll a thick cotton towel into a log shape and place it in a cast-iron pan or deep oven-safe tray.
- Place the pan on the lowest oven rack and preheat the oven to 260 °C (500 °F) for 45 minutes. The towel will scorch slightly — this is expected.
- Load the scored dough onto your baking surface (stone, steel, or sheet pan on a middle rack).
- Carefully pour 300-400 ml (about 1.5 cups) of boiling water over the hot towel. The towel absorbs the water and begins steaming steadily.
- Close the oven door immediately. Bake with steam for 15-20 minutes.
- Remove the pan with towel after 15-20 minutes (carefully — it is heavy and hot). Continue baking at reduced temperature for 20-25 minutes.
Pros
- Produces more sustained, gentle steam than ice cubes or a spray bottle
- Uses materials most people already have
- Reusable (the towel survives dozens of bakes)
- Good compromise between Dutch oven simplicity and lava rock aggressiveness
Cons
- Less aggressive steam than lava rocks
- Cotton towels can char over time — use dedicated baking towels, not your good kitchen linens
- Synthetic towels will melt — only use 100% cotton
- Removing the hot, waterlogged pan is awkward
Method 5: Ice Cubes (Quick Burst)
The ice cube method is the simplest DIY approach, but it produces the least sustained steam.
How It Works
Ice cubes placed on a preheated tray or directly on the oven floor create a burst of steam as they melt and vaporize. The transition from ice to water to steam slows the process slightly compared to boiling water, giving you a brief window of steam.
Step-by-Step Instructions
- Place an empty cast-iron pan or heavy-duty baking tray on the lowest oven rack during preheating.
- Preheat the oven to 260 °C (500 °F) for 45 minutes.
- Load the scored dough onto your baking surface.
- Quickly toss 8-10 ice cubes onto the hot tray. Close the oven door immediately.
- Bake for 15-20 minutes with whatever steam the ice cubes produce.
- Continue baking at reduced temperature for 20-25 minutes.
Pros
- Extremely simple — no special equipment or preparation
- No risk of steam burns from pouring boiling water
- Available in every kitchen with a freezer
Cons
- Steam dissipates quickly — may only last 5-8 minutes
- Less oven spring than sustained steam methods
- Ice cubes on the oven floor can crack glass or damage ceramic coatings
- Temperature drop from the ice hitting the hot surface briefly lowers oven temperature
- Inconsistent results — the amount and duration of steam varies widely
Method 6: Spray Bottle (Least Effective)
Spraying the oven walls with water from a spray bottle is sometimes recommended in older baking books. It is the least effective method and is no longer widely recommended.
How It Works
You spray water onto the oven walls immediately after loading the dough, creating a brief mist of steam. Some bakers spray 3-4 times in the first 5 minutes.
Why It Doesn't Work Well
- Each time you open the oven to spray, you release heat and whatever steam has accumulated
- The amount of moisture delivered is tiny compared to other methods
- Spraying directly on a glass oven door can crack it due to thermal shock
- Spray mist settles within seconds — there is no sustained steam environment
- Repeated oven opening drops the temperature 15-25 °C each time, undermining oven spring
When It Might Make Sense
- As a supplement to another method — a few sprays before closing the lid of a Dutch oven can add a small amount of extra moisture
- For enriched breads (brioche, challah) that need minimal steam
- When you have no other option and something is better than nothing
Method Comparison Summary
| Method | Steam quality | Oven spring | Ease of use | Equipment needed | Multi-loaf |
|---|---|---|---|---|---|
| Dutch oven | Excellent | Excellent | Moderate | Heavy lidded pot | No |
| Combo cooker | Excellent | Excellent | Easy | Lodge combo cooker | No |
| Lava rocks | Very good | Very good | Moderate | Cast-iron pan, lava rocks | Yes |
| Towel method | Good | Good | Moderate | Cast-iron pan, cotton towel | Yes |
| Ice cubes | Fair | Fair | Easy | Baking tray | Yes |
| Spray bottle | Poor | Poor | Easy | Spray bottle | Yes |
For most home bakers, the Dutch oven or combo cooker is the best starting point. They are simple, reliable, and require no technique beyond "preheat, load, cover, bake." The lava rock method is the best choice for bakers who want to scale up or bake on a stone or steel.
Troubleshooting Steam Issues
Problem: Good oven spring but pale, soft crust
Cause: Steam was left in too long. The moisture prevented the Maillard reaction from starting. Fix: Remove the lid or steam source at exactly 20 minutes. If using the lava rock or towel method, crack the oven door for 30 seconds at the 20-minute mark to evacuate remaining steam.
Problem: Minimal oven spring despite good steam
Cause: Likely a fermentation issue, not a steam issue. Over-proofed or under-proofed dough will not spring regardless of steam quality. Fix: Evaluate your fermentation. If the dough was properly proofed, check that your oven and Dutch oven were preheated for a full 45-60 minutes. Insufficient preheat is the second most common cause of weak oven spring after fermentation errors.
Problem: Score doesn't open cleanly
Cause: Either insufficient steam (crust set before the score could bloom), shallow scoring, or a dull blade. Fix: Ensure steam is present from the moment the dough enters the oven. Score 6-12 mm deep with a sharp blade at a 30-45 degree angle. Cold dough scores more cleanly than room-temperature dough.
Problem: Bottom of the loaf is burnt
Cause: The base is too close to the heat source, or the baking surface is too hot. Fix: Place a spare baking sheet on the rack below your Dutch oven or baking stone to act as a heat shield. Alternatively, reduce the oven temperature by 10-15 °C. Some bakers slide a sheet pan under the Dutch oven for the last 10 minutes of baking.
Problem: Crust is thick and chewy instead of thin and crisp
Cause: Too much moisture remaining at the end of baking, or insufficient final bake temperature. Fix: After removing the steam source, bake at full temperature for the remaining time. The dry heat phase needs to be hot enough to drive moisture out of the crust. Some bakers turn on the convection fan for the last 5-10 minutes to accelerate crust drying. Target an internal temperature of at least 96 °C (205 °F) — higher (up to 99 °C / 210 °F) produces a thinner, crispier crust.
Problem: Dutch oven handle melted or knob broke
Cause: Many Dutch oven and lid knobs are rated for lower temperatures than bread baking requires. Phenolic knobs (like the standard Le Creuset knob) may be rated to 190 °C (375 °F) — well below baking temperature. Fix: Replace the knob with a stainless steel one, or remove the knob entirely and use the hole for lifting with a hook or towel. Check your manufacturer's temperature rating before preheating.
Advanced Techniques
Baking on a Steel with Dutch Oven Steam
For maximum oven spring with the best base crust, some bakers combine a baking steel with an inverted roasting pan:
- Place a baking steel on a middle rack. Place a deep roasting pan (upside down) on the same rack, positioned so it can be flipped over the dough after loading.
- Preheat everything for 60 minutes at maximum temperature.
- Slide the dough onto the hot steel.
- Immediately flip the roasting pan over the dough to create a steam chamber.
- After 20 minutes, remove the roasting pan and continue baking.
This gives you the superior heat transfer of a steel (for a crisp, even base) with the steam trapping of a covered pot.
Extending Steam for Higher-Hydration Doughs
Higher-hydration doughs (78%+) produce more internal steam, which means they benefit more from a sealed environment. If you are baking high-hydration loaves and using a DIY steam method, consider extending the steam phase to 25 minutes instead of 20 to give the wetter dough more time to set before the crust hardens.
The Post-Bake Cool-Down
After baking, resist the temptation to tap the bottom of the loaf for the "hollow sound" test. It is unreliable. Instead, use an instant-read thermometer — 96-99 °C (205-210 °F) for lean sourdough. Then cool on a wire rack with air circulating below and around the loaf. This prevents the bottom crust from steaming and becoming soggy. The crumb continues solidifying during cooling — cutting into a hot loaf releases steam that would have helped set the structure, resulting in a gummy interior.
Frequently Asked Questions
Why is steam so important for sourdough bread? Steam keeps the dough surface moist during the first 15-20 minutes of baking, which delays crust formation and allows maximum oven spring. It also gelatinizes surface starch for a shiny, crisp crust and sets the stage for deep browning once the steam is removed. Without steam, the crust sets too early, trapping the dough and preventing it from rising fully.
What is the best steam method for beginners? The Dutch oven is the best starting point. It requires no technique beyond preheating, loading, and covering. The dough's own moisture creates the steam — there is nothing to pour, spray, or time. The results are consistently excellent, and you can focus on perfecting your dough rather than managing steam.
How long should I bake with steam? 20 minutes is the standard for most sourdough loaves. This gives the dough sufficient time for full oven spring and starch gelatinization. After 20 minutes, remove the steam source (or the Dutch oven lid) and continue baking in dry heat for another 20-25 minutes until the internal temperature reaches 96-99 °C (205-210 °F).
Can I use a stainless steel pot instead of cast iron? Yes, but the results may be slightly less dramatic. Cast iron has significantly higher thermal mass — it stores more heat and releases it more evenly. Stainless steel heats and cools faster, which means less sustained radiant heat during the critical first minutes. That said, a stainless steel pot with a tight-fitting lid still produces good steam and noticeably better results than no steam at all.
What temperature should I bake sourdough at? Most sourdough recipes call for 245-260 °C (475-500 °F) during Phase 1 (with steam), dropping to 220-245 °C (430-475 °F) during Phase 2 (without steam). The exact temperature depends on your oven, your loaf size, and how dark you want the crust. Use an oven thermometer — most home ovens display temperatures that are 15-25 °C off from the actual internal temperature.
My oven doesn't go above 230 °C (450 °F). Can I still get good oven spring? Yes, but you may need to extend the bake time slightly. Lower temperature means slower heat transfer, which slows oven spring and crust development. Ensure your Dutch oven or baking surface is preheated for the full 60 minutes to maximize thermal mass. A baking steel (which has more thermal mass than a stone) can help compensate for a cooler oven.
Is the lava rock method safe for my oven? The lava rock method is widely used without problems, but it does carry some risks over time. Repeated steam exposure can corrode oven elements, damage interior enamel, and cause electrical components to degrade faster. If you use this method regularly, inspect your oven elements periodically. The Dutch oven method avoids these risks entirely because the steam stays inside the pot.
What size Dutch oven should I use for sourdough? A 4.5-5.5 quart (4-5 liter) round Dutch oven is ideal for a standard 900g-1kg loaf. The loaf needs room to expand but not so much room that the steam environment is diluted. For batards (oval loaves), look for an oval Dutch oven or use the combo cooker approach. Too small a pot constrains the dough; too large a pot produces a thinner steam layer.
Can I bake sourdough without any steam at all? Technically yes — you will still get bread. But the bread will have less oven spring, a thicker and paler crust, and the score will not open dramatically. If you have tried baking without steam and are satisfied with the results, steam will still improve them. If you are disappointed with flat loaves, minimal ear, and hard crusts, steam is likely the biggest single improvement you can make.
Why does my crust turn soft after cooling? The most common cause is trapping moisture after baking. If you place the hot loaf in a bag, cover it with a towel, or set it on a surface without airflow, the steam escaping from the cooling bread condenses on the crust and softens it. Always cool on a wire rack in open air. For the crispiest crust, some bakers leave the bread in the turned-off oven with the door cracked for 10 minutes after baking.
How do I get a really dark, blistered crust? Dark, blistered crusts come from three factors: sufficient steam during Phase 1 (for starch gelatinization), high temperature during Phase 2 (for aggressive Maillard and caramelization), and available surface sugars (from proper fermentation — not over-fermented). Bake until the crust is darker than you think it should be. Most home bakers under-bake. A well-caramelized crust should be a deep mahogany, not golden brown.
Can I reuse the steam water or lava rocks? Lava rocks are reusable indefinitely — just leave them in the pan between bakes. The water is consumed (evaporated) during baking, so there is nothing to reuse. The cotton towel for the towel method is also reusable; it will discolor and stiffen over time but continues to function.
Do I need steam for enriched breads like brioche or challah? Enriched breads (those with significant butter, eggs, or sugar) generally need less steam than lean sourdough. The fats in the dough keep the surface pliable naturally, and the sugars promote browning without steam-assisted starch gelatinization. Many enriched breads are baked without any steam. If you do use steam, limit it to 10 minutes rather than 20.