In this article
- What Crumb Structure Actually Is
- The Four Factors That Control Crumb
- Factor 1: Hydration
- Factor 2: Fermentation
- Factor 3: Handling
- Factor 4: Shaping
- How the Four Factors Interact
- High Hydration + Gentle Handling = Maximum Openness
- Moderate Hydration + Extended Fermentation = Controlled Openness
- Low Hydration + Firm Shaping = Tight Crumb
- High Hydration + Tight Shaping = Dense Confusion
- Gluten Development Methods: Choosing the Right Tool
- Stretch and Fold
- Coil Fold
- Lamination
- Slap and Fold (Rubaud Method)
- The Recommended Combined Approach
- The Windowpane Test: When to Stop Building Gluten
- Open Crumb: The Complete Strategy
- Formula
- Process
- Tight Crumb: The Complete Strategy
- Formula
- Process
- The Crumb Spectrum: It Is Not Binary
- Reading Your Crumb: What the Slice Tells You
- The Role of Flour
- Why Your Crumb Is Not What You Expected: Troubleshooting
- You Wanted Open Crumb But Got Tight
- You Wanted Tight Crumb But Got Open
- You Got the Fool's Crumb (Dense with Random Large Holes)
- Your Crumb Is Fine but Gummy
- Frequently Asked Questions
Open Crumb Sourdough: Build the Crumb You Want
Learn how fermentation, hydration, gluten development, shaping, and handling affect open crumb so you can control your sourdough texture.
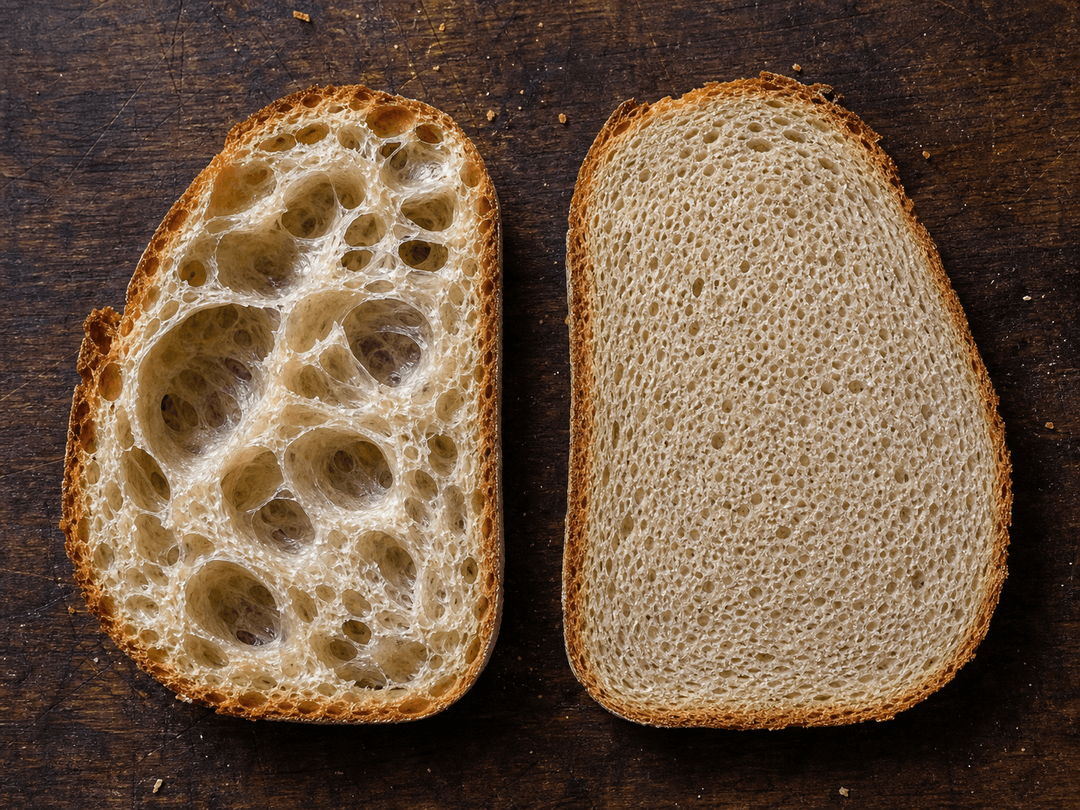
The pursuit of an open crumb — those large, irregular, glistening holes in a slice of sourdough — has become something of an obsession in the home baking community. Instagram feeds are full of crumb shots where the holes are so wide you could lose a finger in them. And there is a pervasive belief that open crumb equals good bread, while tight crumb equals failure.
That belief is wrong.
Open crumb and tight crumb are not better or worse. They are different structures suited to different purposes, and the best bakers choose their crumb deliberately based on what the bread is for. A sandwich loaf with an open crumb is a disaster — condiments drip through, sliced turkey falls out, and every bite has a different texture. A rustic hearth loaf with a tight, uniform crumb misses the point of the style entirely. Austrian Bauernbrot has dense, moist crumb by design, and it would be ruined by the open structure of a ciabatta.
What matters is not whether your crumb is open or tight. What matters is whether you got the crumb you intended. And that requires understanding what actually controls crumb structure — because it is not just one thing. It is the interaction of four variables, and each one can override the others.
This guide breaks down exactly how hydration, fermentation, handling, and shaping work together to produce crumb structure, and teaches you how to manipulate each one to get the result you want on purpose.
What Crumb Structure Actually Is
Before discussing how to control it, you need to understand what crumb structure physically is.
When you mix flour and water, gluten proteins (glutenin and gliadin) hydrate and begin linking together into long, elastic chains. As you develop the dough through mixing, folding, or resting, these chains cross-link into a three-dimensional network — the gluten matrix. Think of it as a web of stretchy, interconnected sheets.
During fermentation, yeast produces carbon dioxide. The CO2 has nowhere to go except into the spaces within the gluten network. As gas accumulates, it inflates pockets in the matrix, stretching the gluten walls thinner and thinner. These gas-filled pockets are what become the holes in your finished crumb.
The final crumb structure is determined by three things:
- How many gas pockets form — more pockets mean more holes
- How large those pockets grow — larger pockets mean bigger holes
- Whether those pockets survive through shaping, proofing, and the early minutes of baking
Every technique decision you make during the bread-making process affects one or more of these three outcomes. And that is what gives you control.
The Four Factors That Control Crumb
Crumb structure is not controlled by a single variable. It is the result of four factors working together — or against each other. Changing one factor while ignoring the others produces unpredictable results. Understanding all four is what separates bakers who get consistent crumb from those who get random results.
Factor 1: Hydration
Hydration — the ratio of water to flour, expressed as a baker's percentage — is the variable most commonly associated with open crumb. And it does matter. But it matters less than most bakers think, and in a more nuanced way than the common narrative suggests.
What hydration actually does: Water serves as a plasticizer for gluten. More water makes the gluten network more extensible — it can stretch further before tearing. This means gas pockets can inflate larger before the gluten walls rupture and the gas escapes. Higher hydration creates more potential for open crumb.
But potential is not outcome. A baker can produce tight crumb at 80% hydration through aggressive kneading and firm shaping. And another baker can produce reasonably open crumb at 68% through gentle handling and extended fermentation. Hydration sets the ceiling, not the floor.
Typical hydration ranges by bread style:
| Bread style | Hydration range | Typical crumb |
|---|---|---|
| Sandwich bread | 60–65% | Tight, uniform, sliceable |
| Standard sourdough | 70–75% | Moderate, irregular, some openness |
| High-hydration sourdough | 76–82% | Open, irregular, large holes possible |
| Ciabatta | 80–85% | Very open, irregular, large holes |
| Rye bread | 75–85% | Tight (rye gluten is weak regardless of hydration) |
The practical takeaway: If you want open crumb, hydration above 72% gives you the potential. Below 68%, the gluten network is simply too stiff for large gas pockets to form, no matter how perfectly you handle everything else. But hydration above 72% does not guarantee open crumb — you still need the other three factors to cooperate.
Factor 2: Fermentation
Fermentation is arguably the most important factor in crumb structure, and it is the one that gets the least attention in crumb discussions.
During bulk fermentation, yeast produces the gas that inflates every hole in your bread. More gas production, distributed over a longer period, creates more and better-distributed gas pockets. The length, temperature, and completeness of fermentation directly determine how much gas your dough contains and how evenly it is spread throughout the gluten matrix.
Under-fermented dough produces the infamous "fool's crumb" — a tight, dense crumb with one or two randomly large holes. The limited gas that was produced migrated into a few weak spots rather than distributing evenly through the matrix. This is the most common crumb problem among home bakers, and it has nothing to do with hydration or handling. It is simply not enough fermentation.
Properly fermented dough has gas distributed throughout the entire matrix. When this dough goes into the oven, oven spring inflates all of those pockets simultaneously. If the dough was also high hydration and gently handled, those pockets inflate into large, open holes. If the dough was lower hydration or firmly shaped, the same even distribution produces a beautiful, uniform crumb with many small holes.
Over-fermented dough has degraded gluten. The walls between gas pockets have been weakened by protease activity and excessive acid production. During baking, those walls collapse. Gas merges into fewer, larger cavities — but in a chaotic, uncontrolled way. The result is a flat loaf with a few huge holes in a dense, gummy matrix. This looks similar to the fool's crumb at first glance, but the causes are opposite.
The practical takeaway: Good crumb — whether open or tight — requires complete, well-managed fermentation. Aim for a 50–75% rise in volume during bulk (adjusted for temperature). Use an aliquot jar to track this objectively. No handling technique can compensate for bad fermentation.
Factor 3: Handling
Handling refers to everything you do to the dough between mixing and the oven: stretch and folds, coil folds, lamination, pre-shaping, bench rest, and final shaping. Each of these steps either preserves or destroys the gas pockets that fermentation created.
Gentle handling preserves gas. Every time you touch the dough, you degas it to some degree. But careful, deliberate movements — like a gentle coil fold — degas minimally. The large gas pockets that fermentation built up survive through the handling process and make it into the oven, where oven spring inflates them further into open crumb.
Aggressive handling destroys gas. Punching down dough, degassing aggressively between folds, slamming the dough during pre-shaping, or rough bench transfers collapse gas pockets. The gluten network remains intact, but the gas distribution is reset. New, smaller bubbles form during proofing, but they start from zero rather than building on the bubbles that bulk fermentation created. The result is a tighter, more uniform crumb.
This is not necessarily bad. If you want tight crumb — for a sandwich loaf, for example — aggressive handling after bulk is exactly the right approach. You want to reset the gas structure and let it re-inflate uniformly during proofing.
But if you want open crumb, every touch must be deliberate and minimal. The gas pockets you built during 4–5 hours of bulk fermentation are fragile. Treat them accordingly.
The practical takeaway: For open crumb, minimize handling after bulk fermentation. Do your folds during the first half of bulk, then leave the dough alone. Pre-shape gently. Final-shape with the minimum number of movements needed to create surface tension. For tight crumb, handle more aggressively — additional folds, firmer pre-shaping, and tighter final shaping.
Factor 4: Shaping
Shaping is the final decisive factor, and it is where many bakers who do everything else right lose their open crumb.
Shaping serves two purposes: it creates surface tension (the taut outer skin that holds the loaf's form during proofing and baking) and it determines the internal gas distribution. These two goals are in tension with each other — literally.
Tight shaping creates strong surface tension. The outer skin is taut, the loaf holds a tall, domed shape, and the scoring opens beautifully. But tight shaping compresses the interior of the dough. Gas pockets are squeezed smaller, some are destroyed, and the resulting crumb is tighter and more uniform.
Gentle shaping preserves the large gas pockets from bulk fermentation. The interior remains airy and open. But gentle shaping creates less surface tension, which means the loaf may spread more during proofing, the scoring may not open as dramatically, and the overall form may be flatter.
This is the fundamental tradeoff of sourdough crumb: more open crumb generally means less dramatic form, and more dramatic form generally means tighter crumb. The Instagram loaves with both a towering ear and a massively open crumb are either the result of very high skill, very high hydration that provides openness despite firm shaping, or — honestly — cherry-picked results from bakers who baked five loaves and posted the best one.
The practical takeaway: For open crumb, shape as gently as possible while still creating enough surface tension to prevent the loaf from pancaking. For tight crumb, shape firmly — multiple folds, tight rolling, aggressive tucking underneath.
How the Four Factors Interact
These four variables are not independent — they interact in ways that matter. Understanding the most common combinations helps you predict and control your results.
High Hydration + Gentle Handling = Maximum Openness
This is the classic open-crumb approach. High hydration (78–82%) creates a dough that is naturally extensible. Gentle handling after a full bulk fermentation preserves the gas. The result is large, irregular holes with thin, glossy walls.
Trade-off: This combination is technically demanding. The dough is difficult to handle, shapes poorly, and requires excellent bench skills.
Moderate Hydration + Extended Fermentation = Controlled Openness
At 70–75% hydration, the dough is manageable but still has enough extensibility for decent hole structure. Extended fermentation at moderate temperatures (24–26 °C for 4–5 hours) creates abundant, well-distributed gas. The result is a crumb with medium-to-large holes that is more consistent and predictable than the high-hydration approach.
This is where most home bakers should aim. It produces beautiful bread with less risk of flat, spread-out loaves.
Low Hydration + Firm Shaping = Tight Crumb
At 62–68% hydration with firm shaping, the dough does not have the extensibility or the gas pressure to create large holes. The crumb is tight, uniform, and even — perfect for sandwiches, toast, and any application where you want a consistent texture.
High Hydration + Tight Shaping = Dense Confusion
This is a common mistake. A baker uses high hydration expecting open crumb, then shapes aggressively because the dough feels too slack. The tight shaping compresses the gas that the hydration enabled, and the crumb comes out dense and disappointing. If you use high hydration, you must also use gentle handling and shaping — the variables must align.
Gluten Development Methods: Choosing the Right Tool
The way you build gluten strength during bulk fermentation affects crumb structure because it determines how much gas redistribution happens during the process. Different methods have different levels of disruption to existing gas pockets.
Stretch and Fold
The standard method for most sourdough. Grab one side of the dough, stretch it upward until resistance stops you, fold it over the center. Rotate 90 degrees. Repeat four times per set. Usually performed 4–6 sets, 30 minutes apart.
Gas disruption: Moderate. Each fold redistributes some gas, but the motion is gentle enough that large pockets survive, especially in later sets when the dough is more developed and gassy.
Best for: All-purpose gluten development. Works well for both open and tight crumb depending on how many sets you do and how aggressively you stretch.
Coil Fold
Lift the dough from the center and let the edges fold underneath by gravity. The dough is never stretched against a surface — it folds itself.
Gas disruption: Minimal. Coil folds are the gentlest method of building strength. Because the dough is never pulled or stretched against the container, gas pockets are largely undisturbed.
Best for: High-hydration doughs (above 78%) where you want to preserve every gas pocket for maximum openness. Also excellent for the later stages of bulk when the dough is full of gas and you want to add strength without degassing.
Lamination
The dough is stretched out paper-thin on a wet counter — as thin as you can get it without tearing — then folded back up into a packet. This is a single, intensive intervention usually done once, replacing one or two stretch-and-fold sets.
Gas disruption: High (once). Lamination completely degasses the dough at the moment it is performed. However, because it is done only once and usually early in bulk (after the first or second fold), there is plenty of fermentation time remaining for gas to rebuild.
Why it works for open crumb: Lamination develops more gluten in one step than several rounds of stretch-and-folds. The resulting strong gluten network can stretch further during oven spring, supporting larger gas pockets. The trade-off is the single degas event, but with adequate remaining fermentation, the gas rebuilds within a stronger matrix.
Best for: Bakers who want strong gluten development with minimal overall handling. Also excellent for incorporating mix-ins (chocolate, olives, dried fruit) without repeated degassing.
Slap and Fold (Rubaud Method)
The dough is slapped onto the work surface and folded over itself repeatedly. This is intensive, fast, and somewhat exhausting. It develops gluten faster than any other hand method.
Gas disruption: Very high. This method is performed early in the process, before significant gas has accumulated, so the disruption is to the nascent gluten network rather than to gas pockets. By the time fermentation starts producing serious gas, the slap-and-fold phase is long over.
Best for: Very high-hydration doughs (80%+) that are too slack to stretch-and-fold effectively. The intensive early development gives the dough enough structure to hold itself together through the rest of bulk.
The Recommended Combined Approach
For bakers targeting open crumb at 75–80% hydration, this sequence balances gluten development with gas preservation:
1. Autolyse (30–60 minutes). Mix flour and water only. Let the flour hydrate and gluten begin to form passively. This reduces the amount of active manipulation needed later.
2. Add starter and salt. Mix until incorporated — by hand, squeezing the dough through your fingers (the Rubaud technique works well here for 3–5 minutes). The goal is even distribution, not full gluten development.
3. Rest 15 minutes. Let the dough relax after mixing.
4. Two sets of stretch and folds, 30 minutes apart. This builds initial gluten structure and begins organizing the matrix.
5. One lamination. Stretch the dough as thin as possible on a wet surface, fold it back into a rectangle, and return it to the container. This is your intensive gluten development step.
6. Two sets of coil folds, 30–45 minutes apart. These add strength gently without disrupting the gas that is now accumulating. After each coil fold, you should notice the dough feeling lighter and more airy.
7. Hands-off until bulk target. After the last coil fold, do not touch the dough. Let fermentation do its work. Monitor with an aliquot jar or by watching the dough rise in a clear container.
Total active folds: 5 interventions over roughly 2.5 hours, followed by 1.5–3 hours of hands-off fermentation (depending on temperature).
Why this sequence works: The early stretch-and-folds and lamination build gluten aggressively when there is not much gas to lose. The later coil folds add strength gently when the dough is full of gas. The hands-off period allows gas to accumulate undisturbed in a strong matrix. The result is a well-developed gluten network full of well-distributed gas — the precondition for open crumb.
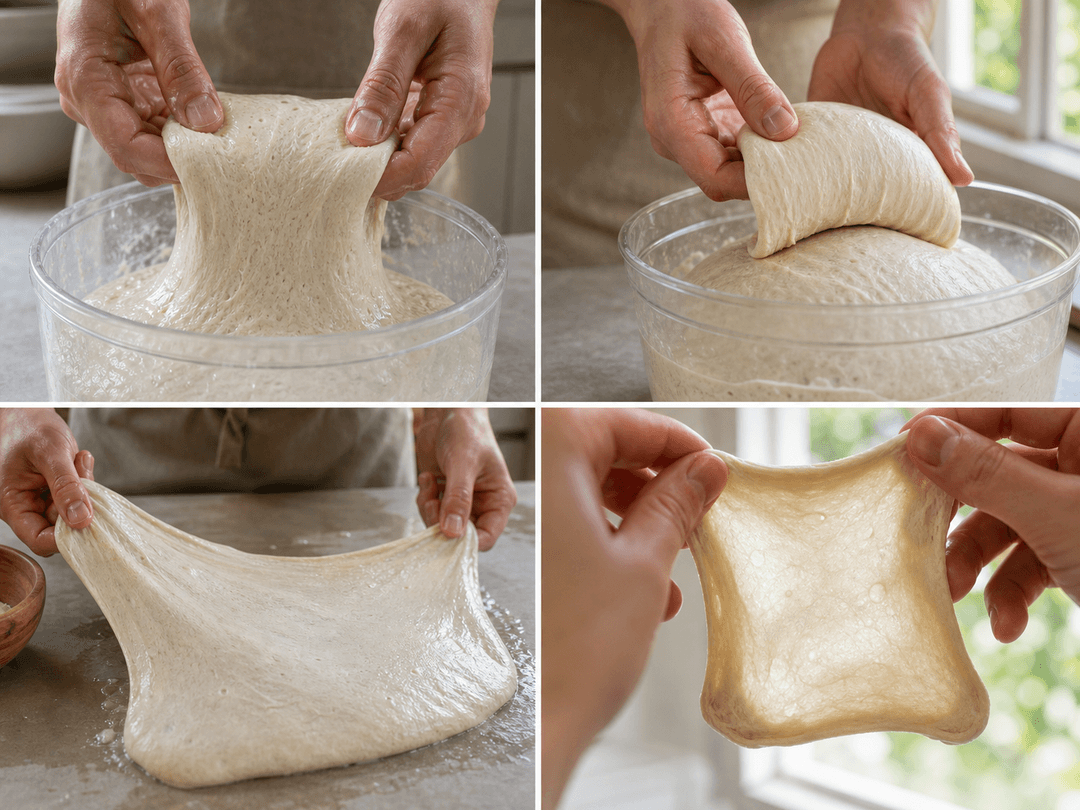
The Windowpane Test: When to Stop Building Gluten
The windowpane test tells you whether gluten development is sufficient. Pinch off a small piece of dough (about the size of a golf ball) and gently stretch it between your fingers, working around the edges to stretch it thinner and thinner. If you can stretch it thin enough to see light through it — translucent, like a window pane — without the dough tearing, gluten development is adequate.
Important caveat for sourdough: Unlike commercial-yeast doughs that are mixed to full gluten development before fermentation, sourdough develops gluten gradually over the course of bulk fermentation. You do not need a perfect windowpane after the initial mix. A partial windowpane (stretches thin but tears before becoming truly translucent) is normal and sufficient at the mixing stage. Fermentation, time, and folds will finish the job.
Check at two points:
- After mixing: A partial windowpane confirms that the basic gluten network has formed.
- After the last fold: A full or near-full windowpane confirms that the dough has enough strength to support gas retention through shaping and baking.
If the dough tears easily at the second checkpoint, you may benefit from one additional coil fold. If it stretches into a beautiful, translucent sheet, you are ready for the hands-off phase.
Open Crumb: The Complete Strategy
If open crumb is your goal, here is the complete approach combining all four variables.
Formula
- Bread flour: 100% (protein 11.5–13%)
- Water: 76–80%
- Starter (ripe, at peak): 10–15%
- Salt: 2%
Process
Autolyse: Mix flour and water. Rest 45–60 minutes, covered.
Mix in starter and salt. Use the Rubaud technique (scoop and fold in the bowl) for 3–5 minutes until evenly combined. Target Final Dough Temperature: 24–26 °C.
Bulk fermentation (4–6 hours at 24–26 °C):
- 0:30 — Stretch and fold set 1
- 1:00 — Stretch and fold set 2
- 1:30 — Lamination (stretch paper-thin on wet counter, fold back up)
- 2:15 — Coil fold set 1
- 3:00 — Coil fold set 2
- 3:00+ — Hands off. Monitor aliquot jar.
- Shape when aliquot jar shows 50–75% rise (adjust for temperature)
Pre-shape: Gently turn the dough out onto a lightly floured surface. Using a bench scraper, tuck the dough underneath itself to form a rough round. Use the minimum number of movements. Do not degas aggressively — every lost bubble is a hole you will not have.
Bench rest: 15–20 minutes, uncovered. The dough should relax and spread slightly but maintain a gently domed shape.
Final shape: For a boule, gently pull the edges toward the center, creating a package, then flip seam-side down and use the bench scraper to gently drag the dough toward you on the unfloured surface, building surface tension underneath. For a batard, gently letter-fold, then roll. Use the lightest touch that creates enough tension to hold the shape. Every unnecessary movement degasses.
Cold retard: Place seam-side up in a well-floured banneton. Cover and refrigerate 12–18 hours.
Bake: Preheat Dutch oven to 245–250 °C (475–480 °F) for 45–60 minutes. Turn dough out onto parchment, score with a lame at 30–45 degrees, and bake covered for 20 minutes. Remove lid, reduce to 230 °C (450 °F), bake 20–25 minutes more until deep golden brown.
Cool: On a wire rack for at least 2 hours before cutting. Cutting too early collapses the crumb while the starch is still setting.
Tight Crumb: The Complete Strategy
For bakers who want a tight, uniform, sliceable crumb — perfect for sandwiches, toast, and any bread that needs to hold toppings — the approach is deliberately different at every step.
Formula
- Bread flour: 100% (protein 11–12.5%)
- Water: 65–70%
- Starter (ripe): 10–15%
- Salt: 2%
- Optional: 5–10% olive oil or butter for softness
Process
No autolyse needed at this hydration. Mix all ingredients directly.
Mix thoroughly. Use the slap-and-fold method for 5–8 minutes, or knead on the counter until the dough is smooth and passes the windowpane test. At lower hydration, you can develop full gluten before bulk fermentation begins.
Bulk fermentation (3.5–5 hours at 24–26 °C):
- 3–4 sets of stretch and folds, 30 minutes apart
- These folds build strength and actively redistribute gas for a more uniform crumb
- Shape when the dough has roughly doubled
Pre-shape firmly. Turn the dough out and use the bench scraper to tighten it into a round with deliberate, firm movements.
Bench rest: 20 minutes.
Final shape firmly. For a sandwich-style loaf in a pan: flatten the dough into a rectangle, fold into thirds like a letter, roll tightly, and place seam-side down in a greased loaf pan. For a free-form boule: tuck aggressively underneath, creating very taut surface tension.
Proof: Room temperature for 1–1.5 hours (pan loaves) or cold retard overnight (boules).
Bake: Pan loaves at 190–200 °C (375–400 °F) for 35–40 minutes. Free-form boules follow the Dutch oven method described above.
The key differences from the open-crumb approach: Lower hydration, more aggressive mixing and folding, firm shaping, and fuller fermentation before shaping. Every step pushes toward a uniform, tight crumb.
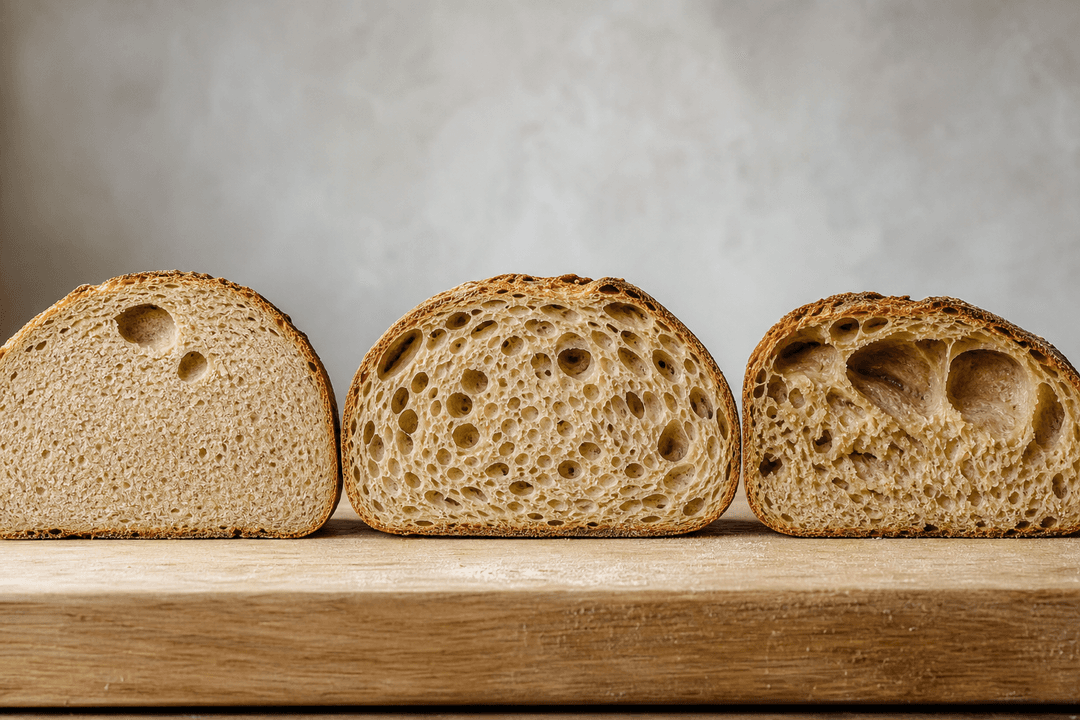
The Crumb Spectrum: It Is Not Binary
Open and tight are not the only two options. Most good sourdough lands somewhere in between — a moderately open crumb with a mix of medium and small holes, some irregularity, and a pleasant, airy texture that still holds a spread of butter without dropping it through.
Think of crumb as a spectrum:
| Crumb type | Hole size | Distribution | Suited for |
|---|---|---|---|
| Very tight | 1–3 mm, uniform | Even throughout | Sandwich loaves, toasting bread |
| Moderately tight | 3–6 mm, mostly uniform | Even with occasional larger holes | Everyday table bread, toast |
| Moderate | 5–15 mm, somewhat irregular | Reasonably even | All-purpose sourdough |
| Moderately open | 10–25 mm, irregular | Concentrated in center, tighter at edges | Artisan hearth bread |
| Very open | 20–50 mm+, wildly irregular | Uneven, large cavities | Ciabatta, high-hydration showcase loaves |
Most home bakers should aim for the moderate range. It is beautiful, versatile, and achievable with standard technique at 72–75% hydration. The extremes — very tight and very open — require more deliberate technique adjustments as described in this guide.
Reading Your Crumb: What the Slice Tells You
After baking, the crumb tells you what happened during fermentation and handling. Learning to read crumb is learning to diagnose your process.
| Crumb appearance | What it means | What to adjust |
|---|---|---|
| Dense throughout, no holes | Under-fermented | Extend bulk fermentation |
| Dense with 1–2 large random holes ("fool's crumb") | Under-fermented | The large holes are gas that migrated to weak spots — extend bulk |
| Even, small holes throughout | Well-fermented, tightly handled | Correct if you want tight crumb |
| Mixed sizes, some medium holes | Well-fermented, moderately handled | Good starting point — adjust handling for more or less openness |
| Large irregular holes, thin walls | Well-fermented, gently handled | Classic open crumb |
| Open at top, dense at bottom | Slightly under-fermented or under-shaped | Gas rose to the top during proofing — extend bulk or improve shaping |
| Very large holes near crust, tight center | Over-proofed or poorly shaped | Gas migrated outward — reduce proofing or improve tension |
| Gummy, wet, collapsed | Over-fermented or cut too soon | Check bulk timing; cool bread fully before slicing (2–4 hours) |
The Role of Flour
Flour choice matters for crumb structure, though it is often overshadowed by technique discussions.
Protein content determines how strong the gluten network can become. Higher-protein flour (12–14%) builds a stronger, more extensible network that can support larger gas pockets without tearing. Lower-protein flour (10–11%) produces a weaker network that tends to produce tighter crumb.
For open crumb, use bread flour with at least 11.5% protein — ideally 12–13%. All-purpose flour (typically 10–11.5%) can produce moderate openness at high hydration, but it is less forgiving. In Austria, a strong W700 at 10.5–11.5% works for moderate openness but may struggle at very high hydration.
Whole grain flour complicates things. The bran particles in whole wheat and whole grain flour physically cut gluten strands like tiny knives. Whole grain doughs have weaker gluten networks even at high protein content. Open crumb is achievable with 15–20% whole grain addition, but becomes increasingly difficult above 30%. At 100% whole grain, a moderately open crumb is a genuine achievement.
Rye flour has very different proteins (secalin instead of glutenin/gliadin) that do not form a traditional gluten network. Rye bread crumb is inherently tight regardless of hydration or handling. If you want open crumb, keep rye content below 15–20% of the total flour.
Why Your Crumb Is Not What You Expected: Troubleshooting
If your crumb consistently does not match your intention, one of the four factors is overriding the others. Here is how to diagnose the issue.
You Wanted Open Crumb But Got Tight
Most likely cause: Under-fermentation. This is by far the most common reason. If the dough did not ferment enough during bulk, there simply is not enough gas to create large holes. No amount of gentle handling or high hydration compensates for insufficient fermentation.
Second most likely: Aggressive shaping. The gas from fermentation was there, but you compressed it out during shaping. Review your shaping technique — are you tightening more than necessary? Can you achieve adequate surface tension with fewer movements?
Third possibility: Too many folds. Excessive folding during the second half of bulk — when the dough is full of gas — redistributes and deflates the large pockets. Stop folding once the dough feels smooth and airy. Let fermentation handle the rest.
You Wanted Tight Crumb But Got Open
Most likely cause: Under-shaping. If your shaping is too gentle, gas pockets from fermentation survive intact and produce an open, irregular crumb. Shape more firmly — more folds, tighter rolling, more aggressive tucking.
Second possibility: Over-fermentation. A dough that fermented too long has weakened gluten. During baking, the damaged gluten walls between gas pockets collapse, and gas merges into large cavities. The resulting crumb looks open, but it is a chaotic, uncontrolled openness accompanied by a gummy texture and dense patches.
You Got the Fool's Crumb (Dense with Random Large Holes)
This is almost always under-fermentation, regardless of hydration. The limited gas that was produced migrated into structural weak points rather than distributing evenly. The fix is straightforward: extend your bulk fermentation. Use an aliquot jar. Make sure your dough has risen 50–75% before shaping.
Your Crumb Is Fine but Gummy
Gumminess is usually a baking issue, not a crumb structure issue. The internal temperature did not reach 96–99 °C (205–210 °F). Bake longer, or use an instant-read thermometer to verify internal temperature. Also ensure you cool the loaf completely on a wire rack — cutting before the crumb has set (starch retrogradation takes 1–2 hours for smaller loaves, 2–4 hours for large boules) creates a gummy texture even in fully baked bread.
Use recipe management directly in the proofit app — baking made simple.
See the sourdough app →Frequently Asked Questions
Does higher hydration automatically mean more open crumb? No. Higher hydration creates more potential for open crumb by making the gluten network more extensible, but it is not sufficient on its own. A baker can produce tight crumb at 80% hydration through aggressive kneading and firm shaping, or reasonably open crumb at 68% through gentle handling and extended fermentation. Hydration sets the ceiling for openness, but fermentation, handling, and shaping determine where you actually land.
What hydration should I use for open crumb? For most bakers, 75–80% is the range where open crumb becomes readily achievable with proper technique. Below 72%, the gluten network is too stiff for large gas pockets to form easily. Above 82%, the dough becomes very difficult to handle and shape without extensive practice. Start at 75% and increase gradually as your handling skills improve.
What is fool's crumb and how do I fix it? Fool's crumb is a dense, tight interior with one or two large, irregular holes — often near the top of the loaf. It looks superficially like open crumb, but the large holes are not evenly distributed. This happens because under-fermented dough has limited gas that migrates to weak spots rather than distributing evenly through a well-developed gluten network. The fix is always the same: extend bulk fermentation until the dough has properly risen 50–75% by volume.
Is open crumb better than tight crumb? No. They are different textures for different purposes. Open crumb is ideal for dipping bread, sopping up sauces, and eating with olive oil. Tight crumb is better for sandwiches, toast, butter, and spreads. Many of the world's best breads — German rye, Japanese shokupan, French pain de mie — have deliberately tight crumb. Choose the crumb that matches how you will eat the bread.
Why does my high-hydration dough spread flat instead of rising? Usually one of three issues: under-fermentation (not enough gas to push upward), weak gluten development (the network cannot hold gas against gravity), or insufficient shaping tension (the dough has no structural support to maintain its dome). All three are more critical at high hydration because the dough is inherently less rigid. Make sure your bulk fermentation is complete, your gluten is well-developed through folds and lamination, and your shaping — while gentle — still creates enough surface tension to hold form.
How do stretch and folds affect crumb openness? Each set of stretch and folds partially redistributes gas in the dough. Gentle folds during the first half of bulk (before significant gas has accumulated) have minimal impact on final crumb. Folds during the second half — when the dough is full of gas — degas more aggressively and push crumb toward a tighter, more uniform structure. For open crumb, complete all folds in the first 2–2.5 hours and leave the dough untouched afterward.
What is lamination and does it help with open crumb? Lamination involves stretching the dough paper-thin on a wet counter surface, then folding it back up. It develops more gluten in one step than several rounds of stretch-and-folds. While lamination fully degasses the dough at the moment it is performed, the resulting stronger gluten network can support larger gas pockets during the subsequent fermentation. When done early in bulk (after the first or second fold set), there is plenty of time for gas to rebuild within a stronger matrix.
Can I get open crumb with whole wheat flour? Open crumb is achievable with up to about 20–30% whole wheat in the mix. The bran particles physically cut gluten strands, weakening the network. At 15–20% whole wheat, you can still get moderately open crumb with high hydration and gentle handling. Above 30%, crumb tends to be moderate to tight regardless of technique. At 100% whole wheat, a moderately open crumb is genuinely difficult and requires strong flour, high hydration (80%+), and very careful handling.
How does shaping tension affect crumb? Shaping tension and crumb openness are in direct opposition. Tight shaping creates strong surface tension (which gives the loaf its tall, domed shape and dramatic ear) but compresses gas pockets, producing tighter crumb. Gentle shaping preserves gas pockets for open crumb but creates less surface tension, often resulting in a flatter loaf. This is the fundamental tradeoff in sourdough baking — most bakers need to find a balance that suits their goals.
What is the best crumb for sandwich bread? A tight to moderately tight crumb with uniform 2–5 mm holes is ideal for sandwiches. This holds condiments without dripping, supports fillings without crumbling, and slices cleanly. To achieve this, use 65–70% hydration, develop gluten fully through kneading, shape firmly, and allow full fermentation before shaping. A small amount of fat (olive oil or butter at 5–10%) softens the crumb further.
Why does my crumb look different from day to day even when I follow the same recipe? Temperature is the most likely variable. A 3–4 degree difference in dough temperature changes fermentation speed significantly, which affects gas production and gluten degradation. If your bulk runs too short on a cool day (under-fermentation) or too long on a warm day (over-fermentation), the crumb changes even though the recipe is identical. Use the aliquot jar method and measure your Final Dough Temperature to get consistent results regardless of season.
Does the scoring pattern affect crumb structure? Scoring affects oven spring more than crumb structure directly. A well-scored loaf with a dramatic ear has experienced directional oven spring — the dough expanded upward along the score line. This does not change the internal hole distribution, but it can stretch existing gas pockets in the direction of the spring, making holes appear more elongated near the score. The crumb in the center of the loaf is largely unaffected by scoring pattern.
How long should I wait before cutting bread to see the crumb? At least 2 hours for a standard boule, and up to 4 hours for larger loaves. During cooling, starch retrogradation occurs — the starch molecules that gelatinized during baking re-crystallize into a stable structure. Cutting before this process completes results in a gummy, compressed crumb that does not reflect the true structure of the bread. If you want an accurate picture of your crumb, patience is essential.
Can I improve crumb openness by changing my oven setup? Oven spring — the rapid rise in the first 15–20 minutes of baking — inflates the gas pockets that fermentation created. Maximizing oven spring maximizes crumb openness. A properly preheated Dutch oven (245–250 °C for 45–60 minutes), baking from cold dough straight from the fridge, and adequate steam (the Dutch oven lid provides this) are the key oven-side factors. Insufficient preheating or missing steam can leave crumb potential unrealized.
What is the single most important factor for consistent crumb? Consistent fermentation. If you nail the fermentation — proper starter activity, correct Final Dough Temperature, appropriate bulk duration tracked by volume rise rather than time — you will get predictable crumb regardless of small variations in handling. Fermentation determines how much gas is in the dough and how it is distributed. Everything else modifies the outcome that fermentation established.