In this article
- Why Dough Development Matters
- Autolyse: The Passive Foundation
- What It Is
- What Happens During Autolyse
- True Autolyse vs. Fermentolyse
- Timing by Flour Type
- When to Skip Autolyse
- Stretch and Fold: Building Strength in Early Bulk
- What It Is
- How to Do It
- What It Does
- How Many Sets?
- Intensity
- Coil Fold: Gentle Strength for Gas-Rich Dough
- What It Is
- How to Do It
- Why Coil Folds Are Gentler
- When to Use Coil Folds
- How Many Coil Folds?
- Lamination: Maximum Gluten Development in One Step
- What It Is
- How to Do It
- Why Lamination Works
- When to Use Lamination
- When to Skip Lamination
- Comparison Table: All Four Techniques at a Glance
- Building a Dough Development Plan
- The Recommended Combined Approach
- Why This Sequence Works
- Adapting for Different Situations
- The Windowpane Test: Knowing When to Stop
- Common Mistakes and How to Avoid Them
- Frequently Asked Questions
Autolyse, Stretch & Fold, Coil Fold Guide
Learn when to use autolyse, stretch and fold, coil folds, and lamination to build gluten without damaging sourdough structure.
Every sourdough recipe includes a list of steps between mixing and shaping: autolyse, stretch and fold, coil fold, lamination. If you are relatively new to sourdough, these steps can feel like rituals performed for their own sake — you do them because the recipe says so, but you are not entirely sure why one step appears instead of another, or what would happen if you swapped them.
That uncertainty leads to two common problems. Some bakers skip or rush steps that matter, ending up with weak, underdeveloped dough that spreads flat in the oven. Others do every technique in every bake, over-handling the dough until it is exhausted and degassed, with a tight, dense crumb to show for it.
The truth is that each of these four techniques serves a specific purpose in dough development. They are not interchangeable, and they are not all required in every bake. Understanding what each one does — mechanically and biochemically — lets you choose the right tools for the bread you are making, combine them in the right order, and know when to stop.
This guide breaks down each technique individually, compares them directly, and then shows you how to build a dough development plan that matches your flour, hydration, and desired outcome.
Why Dough Development Matters
Before diving into individual techniques, it helps to understand what dough development actually accomplishes and why it is the bridge between a shaggy mix and a loaf with structure.
When flour meets water, two groups of proteins — glutenin and gliadin — hydrate, uncoil, and begin linking together into long elastic chains. These chains cross-link into a three-dimensional web called the gluten matrix. This matrix is the scaffold of your bread. It traps the carbon dioxide that fermentation produces, stretches during oven spring, and sets during baking to create crumb structure.
A weak gluten matrix means poor gas retention. Gas escapes instead of inflating the dough. The loaf rises poorly, spreads sideways, and produces dense, tight crumb. A well-developed gluten matrix means excellent gas retention. Gas inflates the dough evenly, oven spring is dramatic, and the crumb — whether you are targeting open or tight — is well-structured and intentional.
The four techniques covered in this guide all develop gluten, but they do it in fundamentally different ways, at different intensities, and at different points in the process. Choosing the right technique at the right time is what separates methodical bakers from those who follow recipes on autopilot.
Autolyse: The Passive Foundation
What It Is
Autolyse is the simplest technique in this guide, and it requires zero effort from the baker. You mix flour and water — nothing else — and let the mixture rest. That is it. The work happens at the molecular level while you do something else entirely.
The technique was developed by the French baking professor Raymond Calvel in 1974. Calvel was looking for a way to reduce mixing time in commercial bakeries without sacrificing dough quality, and he discovered that simply resting the flour-water mixture before adding other ingredients produced dough that was more extensible, easier to work, and better in flavor.
What Happens During Autolyse
Two enzyme families go to work during the rest:
Proteases break down some of the gluten proteins. This sounds counterproductive — why would you want to weaken gluten? — but the result is increased extensibility. The dough becomes easier to stretch without tearing. For bread, extensibility matters as much as strength: you need the dough to stretch during oven spring without the gluten walls rupturing and releasing gas.
Amylases break down damaged starch into simple sugars. These sugars serve as food for the yeast during fermentation and contribute to browning and flavor during baking. More available sugar means more vigorous fermentation and a more flavorful crust.
Beyond enzymes, the rest period gives flour time to fully hydrate. Flour does not absorb water instantly — it takes time for water molecules to penetrate the starch granules and protein structures. A well-hydrated flour produces a smoother, more cohesive dough with less mixing effort.
True Autolyse vs. Fermentolyse
A true autolyse contains only flour and water. No salt. No starter.
Salt delays enzyme activity — particularly protease — which reduces the effectiveness of the rest. Adding salt during autolyse is not wrong, but it is not autolyse. It is a salt-included rest, and it will produce less extensibility improvement than a true autolyse.
Adding active starter to the autolyse creates what some bakers call a fermentolyse. The starter begins fermenting immediately, which means acid production starts during the rest. Acid strengthens gluten, which partially counteracts the extensibility benefits of autolyse. Fermentolyse can work well, but you should limit it to 30-45 minutes to prevent the dough from developing too much acidity before you have a chance to build structure through folding.
Timing by Flour Type
Not all flours benefit equally from autolyse, and the optimal duration varies:
| Flour type | Optimal autolyse | Why |
|---|---|---|
| White bread flour (W550/T65) | 20-45 minutes | Hydrates quickly; enzymes work efficiently |
| High-protein bread flour (12-14%) | 30-60 minutes | Tighter gluten benefits from longer protease activity |
| Whole wheat (up to 30%) | 1-2 hours | Bran needs time to hydrate; absorbs more water over time |
| High whole wheat (50-100%) | 2-4 hours | Extensive bran hydration; protease softens tough gluten |
| Freshly milled flour | Skip or keep very short (15 min) | Already has very high enzyme activity; long autolyse risks over-degradation |
| Rye flour (dominant proportion) | Skip entirely | Rye has no meaningful gluten; autolyse wastes time |
| Spelt flour (dominant proportion) | Skip or keep short (15-20 min) | Spelt gluten is already very extensible; further protease activity makes it too weak |
When to Skip Autolyse
Autolyse is not universally beneficial. Skip it when:
- Your flour is already highly extensible (spelt, soft wheat, freshly milled)
- You are making a rye-dominant bread (no gluten network to develop)
- Your schedule does not allow an extra rest (autolyse is helpful, not essential)
- You are using a prefermented flour (poolish, biga) that already provides enzyme-driven extensibility
Stretch and Fold: Building Strength in Early Bulk
What It Is
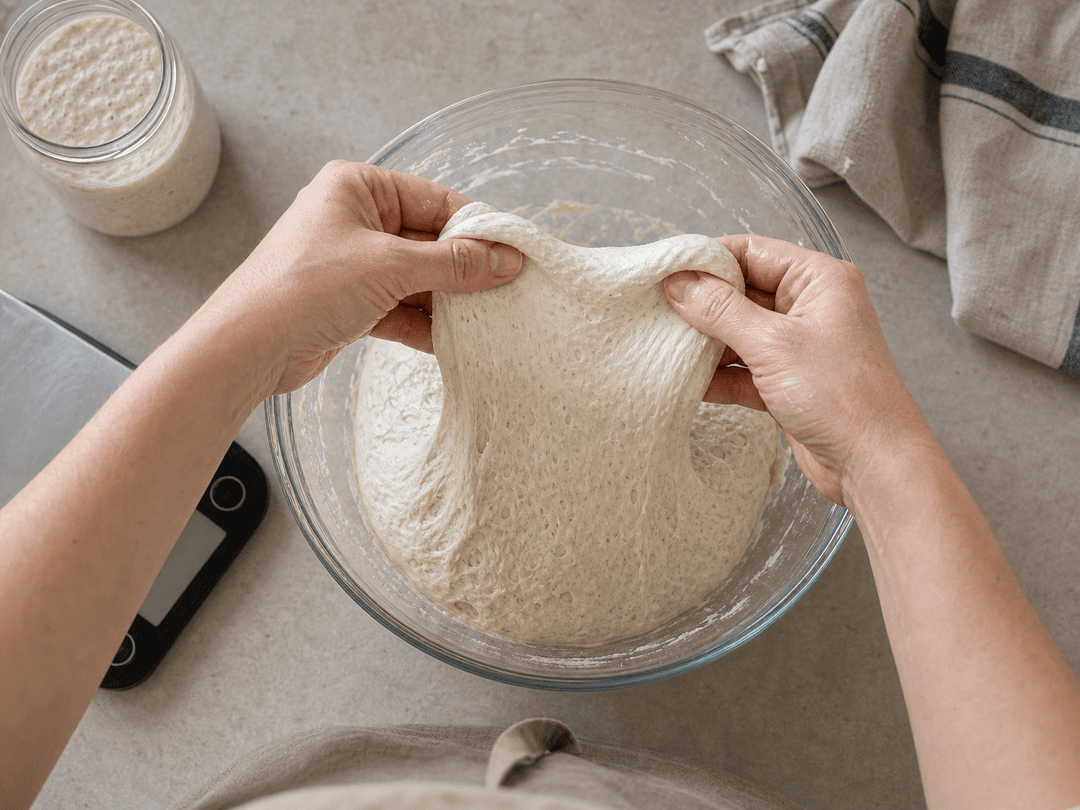
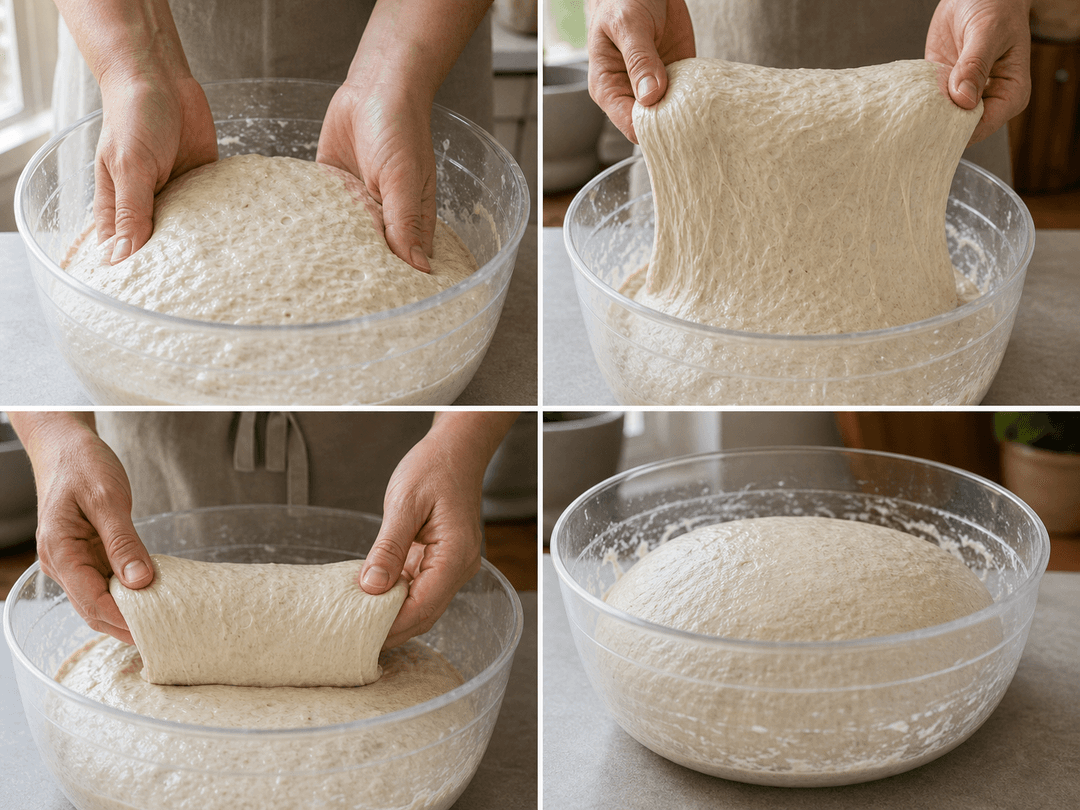
Stretch and fold is the workhorse of sourdough dough development. You reach into the container, grab one side of the dough, pull it upward until the gluten resists, then fold it over the center of the dough mass. Rotate the container 90 degrees and repeat. Four stretches — north, south, east, west — constitute one set.
How to Do It
- Wet your hand to prevent sticking.
- Slide your fingers under one edge of the dough.
- Lift that edge straight up, stretching until you feel firm resistance. Do not pull until it tears.
- Fold the stretched portion over the center of the dough.
- Rotate the container 90 degrees.
- Repeat steps 2-5 three more times (four folds total per set).
- Cover and rest 30 minutes before the next set.
What It Does
Each stretch-and-fold set accomplishes several things simultaneously:
Aligns gluten strands. The stretching motion pulls gluten chains into parallel alignment, which strengthens the network. Think of it like combing tangled hair — the fibers are all there, but they work better when organized.
Redistributes gas. During the early stages of bulk fermentation, gas production has just begun. The folds distribute the small bubbles that have formed, ensuring even gas distribution throughout the dough. This is the foundation for an even crumb.
Equalizes temperature. In a large mass of dough, the center can be several degrees warmer than the edges (or cooler, depending on ambient conditions). Folding brings all parts of the dough into contact, evening out the temperature and ensuring consistent fermentation throughout.
Incorporates oxygen. The folding action introduces a small amount of air into the dough, which yeast needs for the initial aerobic phase of fermentation. This boosts early yeast activity.
How Many Sets?
Most sourdough recipes call for 4-6 sets, spaced 30 minutes apart. But the right number depends on the dough:
- Low-hydration dough (65-70%): 3-4 sets are usually sufficient. The dough is stiff enough that it develops strength quickly.
- Moderate-hydration dough (70-76%): 4-5 sets. The standard approach for most sourdough.
- High-hydration dough (76-82%): 5-6 sets, or transition to coil folds after the first 2-3 stretch-and-fold sets. High-hydration dough takes longer to build strength.
How to know when you have done enough: After the final set, the dough should feel noticeably smoother and more cohesive than after the first set. It should hold its shape briefly when you stop folding — not slump immediately into a flat puddle. When you stretch it, it should resist with gentle elasticity rather than tearing or stretching endlessly.
Intensity
Stretch and fold is a moderate-intensity technique. It disrupts existing gas pockets more than coil folds but far less than kneading or slap-and-fold. In the early stages of bulk (sets 1-3), there is relatively little gas in the dough, so the disruption is minimal. In later sets, more gas has accumulated and the folds do redistribute some of it. This is why many bakers transition from stretch-and-folds to coil folds partway through bulk — to preserve the gas that is building up.
Coil Fold: Gentle Strength for Gas-Rich Dough
What It Is
A coil fold builds gluten strength using gravity rather than force. Instead of stretching the dough against the container, you lift the center of the dough and let the edges fold underneath by their own weight. The dough coils under itself — hence the name.
How to Do It
- Wet both hands.
- Slide your fingers under the center of the dough from both sides.
- Lift the center straight up. The edges of the dough will detach from the container and drape downward.
- Continue lifting until one end of the dough folds completely underneath the center.
- Gently lower the dough so the other end folds underneath as well.
- You have completed one coil fold. The dough should now be sitting on top of its folded edges.
- Optionally rotate the container 90 degrees and perform a second coil fold perpendicular to the first.
Why Coil Folds Are Gentler
The critical difference is that the dough is never pulled against a surface. In a stretch and fold, your hand stretches the dough while the container or the rest of the dough mass acts as an anchor — creating tension. In a coil fold, the only force acting on the dough is gravity. The dough's own weight causes it to fold, and this weight-driven folding is significantly less disruptive to gas pockets.
This matters most in the later stages of bulk fermentation. After 2-3 hours of fermentation at 24-26 °C, the dough is full of gas. Aggressive stretching at this point pops bubbles and degasses the dough. Coil folds add strength — they still align gluten strands and build tension — without destroying the gas architecture that fermentation has built.
When to Use Coil Folds
- During the second half of bulk fermentation, after you have already built initial strength with stretch-and-folds or another method
- For high-hydration doughs (78%+), which are too slack to stretch-and-fold effectively without tearing
- When you want to preserve gas for maximum crumb openness
- As a diagnostic tool: when you coil fold well-fermented dough, you can feel how light and airy it has become. This tactile feedback tells you how fermentation is progressing.
How Many Coil Folds?
Typically 2-3 coil folds, spaced 30-45 minutes apart, after the initial stretch-and-fold phase. The dough should feel progressively lighter with each fold. After the last coil fold, the dough should hold a domed shape in the container rather than leveling out flat.
Lamination: Maximum Gluten Development in One Step
What It Is
Lamination is the most intensive single gluten development step available to hand bakers. You take the dough out of the container, stretch it paper-thin across a wet counter surface — as thin as you can get it without tearing — and then fold it back into a compact package. It replaces one or two stretch-and-fold sets and accomplishes more gluten development than either would.
How to Do It
- Wet your counter surface generously. The dough will stick to a dry surface and tear.
- Gently turn the dough out onto the wet counter.
- Starting from the center, use your fingertips to gently stretch the dough outward in all directions. Work slowly. Let the dough relax if it resists.
- Continue stretching until the dough is as thin as possible — ideally thin enough to see the counter surface through it. A well-developed dough can stretch remarkably thin. If holes appear, that is fine; just stop stretching in that area.
- If you are adding mix-ins (seeds, olives, cheese, dried fruit, chocolate), distribute them evenly over the stretched dough now.
- Fold the dough like a letter: fold the left third over the center, then the right third over that. Then fold the top third down and the bottom third up. You should have a compact rectangle.
- Return the folded dough to the container.
Why Lamination Works
When you stretch the dough paper-thin, you are physically aligning every gluten strand in the sheet. The subsequent folding layers these aligned strands on top of each other at perpendicular angles, creating a cross-hatched gluten structure that is remarkably strong. One lamination develops more gluten than 2-3 sets of stretch and folds.
The trade-off is complete degassing. At the moment of lamination, the dough loses all of its accumulated gas. But because lamination is performed early in bulk — typically after the first or second stretch-and-fold set, roughly 60-90 minutes into fermentation — there is relatively little gas to lose. The remaining 2-4 hours of fermentation rebuild gas within a much stronger gluten matrix, which ultimately supports larger gas pockets and better oven spring.
When to Use Lamination
- When you want strong gluten development with minimal overall handling. One lamination plus 2 coil folds develops more gluten than 5-6 stretch-and-fold sets, with less total touching of the dough.
- When incorporating add-ins. Lamination is the ideal moment to add seeds, nuts, olives, cheese, dried fruit, or chocolate. The thin sheet allows even distribution without the repeated folding that other incorporation methods require. One lamination evenly distributes mix-ins, whereas adding them during stretch-and-folds often requires 2-3 extra sets to achieve the same distribution.
- For high-hydration doughs that need a structural boost. The intensive gluten development gives slack doughs enough strength to hold their shape through the rest of bulk and through shaping.
When to Skip Lamination
- For low-hydration doughs (below 68%) that are too stiff to stretch thin without tearing
- For rye-dominant doughs that have no gluten network to develop
- When you are late in bulk fermentation and the dough is already full of gas — the degassing at this point would be counterproductive
- When your schedule is tight and you do not have the 5-10 minutes it takes to laminate carefully
Comparison Table: All Four Techniques at a Glance
| Autolyse | Stretch & Fold | Coil Fold | Lamination | |
|---|---|---|---|---|
| What it does | Passive hydration + enzyme activity | Active gluten alignment + gas redistribution | Gentle gluten alignment via gravity | Intensive gluten layering in one step |
| Intensity | None (passive) | Moderate | Low | High (single event) |
| Gas disruption | None | Moderate | Minimal | Complete (but done early) |
| Typical timing | Before adding salt/starter | First half of bulk | Second half of bulk | Early-to-mid bulk (replaces 1-2 S&F sets) |
| Repetitions | Once (20 min to 4 hours) | 4-6 sets, 30 min apart | 2-3 sets, 30-45 min apart | Once |
| Best for | Extensibility, hydration, flavor | All-purpose gluten building | Preserving gas in developed dough | Maximum gluten + incorporating add-ins |
| Skip when | Spelt, rye, freshly milled, tight schedule | Dough already strong enough | Early bulk (not enough structure yet) | Low hydration, rye, late in bulk |
Building a Dough Development Plan
Knowing what each technique does individually is useful. Knowing how to combine them into a coherent plan is what makes you a better baker. Here is a recommended sequence for a standard sourdough at 75-80% hydration, and the reasoning behind each step.
The Recommended Combined Approach
Step 1: Autolyse (30-60 minutes) Mix flour and water only. No salt, no starter. Cover and rest. This gives enzymes time to work and flour time to hydrate fully.
Step 2: Add starter and salt, mix until incorporated (3-5 minutes) Use the pinch-and-fold method or the Rubaud technique. The goal is even distribution, not full development. The dough will be shaggy and rough — that is expected.
Step 3: Rest 15 minutes Let the dough relax after mixing. The gluten is disorganized from the mixing and needs time to re-form bonds.
Step 4: Two sets of stretch and folds, 30 minutes apart These build the initial gluten architecture. After two sets, the dough should feel noticeably smoother and more elastic.
Step 5: One lamination This is your intensive development step. Stretch the dough as thin as possible on a wet surface. Add mix-ins now if using. Fold back into a rectangle and return to the container. At this point, the gluten network should be well-established.
Step 6: Two sets of coil folds, 30-45 minutes apart Gentle strengthening that preserves the gas now accumulating in the dough. After each coil fold, notice how the dough feels lighter and more airy.
Step 7: Hands off until bulk target After the last coil fold, do not touch the dough. Let fermentation do its work. Monitor volume rise with an aliquot jar or by marking the dough level on your container. Shape when you see 50-75% rise (adjusted for temperature and flour).
Total active interventions: 5 (2 stretch-and-folds + 1 lamination + 2 coil folds) over roughly 2.5 hours, followed by 1.5-3 hours of hands-off fermentation.
Why This Sequence Works
The logic follows the gas lifecycle of the dough:
- Early bulk (little gas): Use higher-intensity techniques — stretch and folds and lamination — because there is minimal gas to lose. This is the time to build gluten aggressively.
- Mid bulk (gas accumulating): Switch to coil folds. The dough needs more strength, but you do not want to destroy the gas that fermentation has been building.
- Late bulk (gas-rich): Stop touching the dough entirely. Every fold at this point degasses more than it strengthens. Trust the gluten network you built earlier and let gas accumulate undisturbed.
Adapting for Different Situations
Lower hydration (65-72%): Skip lamination (the dough is too stiff to stretch thin). Use 4-5 sets of stretch and folds instead. Coil folds are optional.
Very high hydration (80%+): Consider adding a third stretch-and-fold set before lamination, or extend the autolyse to 60 minutes. The slack dough needs more structural intervention early on.
Whole grain flour (30%+): Extend the autolyse to 1-2 hours to let the bran hydrate. Use fewer total folds — whole grain gluten is fragile and over-handling degrades it. 2 stretch-and-folds + 1-2 coil folds may be enough.
Enriched dough (butter, oil, eggs): Fat coats gluten strands and slows development. You may need an extra set of stretch and folds. Adding fat after the initial gluten structure is built (after autolyse + first fold) is more effective than mixing it in from the start.
The Windowpane Test: Knowing When to Stop
The windowpane test tells you whether your gluten development is sufficient. Pinch off a small piece of dough (roughly golf-ball-sized) and gently stretch it between your fingers, working around the edges to thin it out. If you can stretch it thin enough to see light through it — translucent, like a window pane — without the dough tearing, gluten development is adequate.
For sourdough, check at two points:
- After the last stretch-and-fold or lamination: A partial windowpane (stretches thin but tears before becoming truly translucent) is normal and sufficient. Fermentation and time will complete the development.
- After the last coil fold: A full or near-full windowpane confirms the dough has enough strength to hold gas through shaping and baking.
If the dough tears easily at the second checkpoint, consider one additional coil fold. If it stretches into a beautiful translucent sheet, you are ready for the hands-off phase.
Important: The windowpane test is a guideline, not a rigid requirement. Some whole grain doughs will never achieve a perfect windowpane because the bran particles interrupt the gluten network. Judge these doughs by their overall feel — smooth, cohesive, and elastic — rather than by translucency alone.
Common Mistakes and How to Avoid Them
Mistake 1: Treating all techniques as interchangeable. Stretch and folds and coil folds are not the same thing and cannot simply be swapped. If a recipe calls for coil folds in the second half of bulk, switching to stretch and folds will degas the dough more aggressively and may produce a tighter crumb. Respect the recipe's choice of technique — or understand the trade-offs if you substitute.
Mistake 2: Over-handling. More folds do not always mean better bread. After a certain point, additional handling degasses the dough without meaningful strength gains. If the dough feels smooth, elastic, and passes a partial windowpane, stop folding. More is not better.
Mistake 3: Skipping autolyse to save time. A 30-minute autolyse reduces the number of stretch-and-fold sets needed by 1-2 and improves dough extensibility. The time "spent" on autolyse is recovered by needing fewer folds. It is not wasted time — it is invested time.
Mistake 4: Laminating too late in bulk. Lamination completely degasses the dough. If you laminate 3 hours into a 5-hour bulk, you are destroying 3 hours of gas production. Laminate within the first 60-90 minutes of bulk, when gas production has barely begun.
Mistake 5: Folding on a schedule instead of by feel. Recipes say "fold every 30 minutes" because they need to give concrete timing. But the dough does not care about your timer. Some doughs develop faster (warm kitchen, strong flour, active starter) and some develop slower. Learn to assess the dough by touch and appearance: is it getting smoother? More elastic? More airy? Let the dough tell you when it needs another fold and when it is done.
Frequently Asked Questions
What is the difference between autolyse and just resting the dough? A true autolyse is a rest of flour and water only — no salt, no starter. This allows protease and amylase enzymes to work without interference. Salt inhibits protease activity, and starter introduces acids that tighten the gluten. A generic "rest" with all ingredients mixed in still provides some hydration benefit, but the enzyme-driven improvements in extensibility and sugar production are reduced. If you want the full benefits of autolyse, keep salt and starter out until the rest is complete.
Can I do autolyse overnight? For white flour, overnight autolyse (8-12 hours, refrigerated) is possible but risky. The extended enzyme activity can over-degrade the gluten, producing a slack, sticky dough that is difficult to develop. For whole grain flour, an extended cold autolyse (refrigerated, 4-8 hours) can work well because the bran needs significantly more time to hydrate. If you try an overnight autolyse, always refrigerate to slow enzyme activity.
How do I know if I am doing stretch and folds correctly? After a correct set of stretch and folds, the dough should feel noticeably smoother and tighter than before. The surface should look more cohesive. If the dough looks the same before and after, you are likely not stretching far enough — pull upward until you feel genuine resistance, then fold. If the dough is tearing, you are stretching too aggressively or the gluten has not developed enough yet. Wait longer between sets.
Can I replace all stretch and folds with coil folds? You can, but the dough will develop more slowly. Coil folds are gentler, which means they build strength less aggressively. If you use only coil folds, you may need 5-7 sets (instead of 4-5 stretch-and-fold sets) to achieve comparable gluten development. This works fine if you have the patience, and it produces excellent results for high-hydration doughs where gas preservation is the priority.
Is lamination necessary for good bread? No. Millions of excellent sourdough loaves are baked without lamination. Lamination is a tool for specific situations: when you want maximum gluten development in one step, when you are incorporating mix-ins, or when you are working with high-hydration dough that needs a structural boost. For a standard sourdough at 72-75% hydration, 4-5 sets of stretch and folds produce perfectly good gluten development without lamination.
What surface should I use for lamination? A clean counter or large cutting board, generously wetted with water. Do not use flour — the wet dough will absorb the flour and become patchy. Do not use oil — it makes the dough too slippery to control. Plain water provides the right balance of slip and grip for stretching the dough thin.
How thin should the dough be during lamination? As thin as you can get it without tearing. With well-developed dough, you should be able to see the counter surface through the sheet. Small holes are acceptable — they will seal when you fold the dough back up. The thinner you stretch, the more gluten alignment you achieve. But do not force it: if the dough resists and starts tearing in multiple places, it is not ready for lamination (more stretch-and-fold sets are needed first).
What if my dough is too sticky for stretch and folds? Wet your hands thoroughly before each set. If the dough is extremely slack (above 80% hydration), you may find coil folds easier because you never have to grip the edge of the dough — you just lift from the center. Alternatively, the Rubaud method (scoop and fold inside the container) works well for very wet doughs that are difficult to stretch upward.
Should I combine all four techniques in every bake? Not necessarily. The recommended combined approach (autolyse + stretch and folds + lamination + coil folds) is ideal for high-hydration sourdough targeting open crumb. For simpler bakes — a sandwich loaf at 65% hydration, for example — you may only need stretch and folds. Match your technique selection to the demands of the dough and the outcome you want.
How does room temperature affect how many folds I need? Warmer kitchens (above 26 °C) accelerate both fermentation and gluten development. You may need fewer folds because the dough develops faster, but you also have less time before the dough is over-fermented. In cool kitchens (below 22 °C), everything slows down. You may need an extra fold set, but you also have a wider window to work within. Pay attention to the dough, not just the clock.