In this article
- Why No-Knead Works
- 1. Hydration + Time (Autolyse)
- 2. Stretch and Folds (Minimal Handling)
- 3. Fermentation Itself
- The Schedule: Two Realistic Options
- Option A: Morning Bake (Fresh Bread for Breakfast)
- Option B: Evening Bake (Shape in Morning, Bake After Work)
- The Recipe
- Ingredients
- Baker's Percentages Breakdown
- Why These Choices
- Equipment
- Step-by-Step Instructions
- Evening (15 Minutes of Work)
- Morning (10 Minutes of Work)
- Temperature and Timing Adjustments
- Tips for Fitting Sourdough Into a Busy Life
- Keep Your Starter in the Fridge
- Prep on Autopilot
- Embrace Imperfection
- Batch and Freeze
- Use the Discard
- Troubleshooting
- "My dough is a sticky mess and I can't shape it."
- "My bread is dense and did not rise much."
- "My bread is very sour."
- "The crust is soft, not crispy."
- "My score did not open."
- Scaling the Recipe
- Variations
- Seeded Loaf
- Olive and Rosemary
- Darker, More Flavorful
- Weekday Sandwich Loaf
- Frequently Asked Questions
No-Knead Overnight Sourdough for Weekdays
Make no-knead overnight sourdough with a realistic weekday timeline, full ingredient table, shaping steps, and baking tips.
Most people give up on sourdough not because they lack skill, but because they lack time. The recipes they find assume a baker who is home all day, available to fold the dough every 30 minutes, watching the rise like a hawk, and standing by the oven at exactly the right moment. That is not realistic if you work a full-time job, have kids, or simply do not want your weekends hijacked by a bread project.
Here is the truth that experienced bakers know: time does the work. Not your hands. Not a stand mixer. Not some elaborate kneading technique. When you combine flour, water, salt, and active sourdough starter and then leave the dough alone for long enough, gluten develops on its own through a process called autolysis. The water hydrates the flour proteins, the proteins bond and align into sheets, and the natural fermentation process strengthens the network further. All of this happens without you touching the dough.
A no-knead method is not a shortcut or a compromise. It is how bread was made for thousands of years before mechanical mixers existed. You are simply letting chemistry and biology do what they do best — given enough time.
This article gives you a complete no-knead sourdough recipe with a realistic weekday schedule. You will spend about 15 minutes of hands-on time in the evening, and another 10 minutes in the morning. The rest is waiting — and you can sleep through most of it.
Why No-Knead Works
Traditional bread recipes call for 10–15 minutes of vigorous kneading. The purpose of kneading is to develop gluten — the elastic protein network that traps gas from fermentation, giving bread its structure and chew.
But kneading is not the only way to develop gluten. There are three mechanisms:
1. Hydration + Time (Autolyse)
When flour and water are mixed, the proteins glutenin and gliadin begin to hydrate and form gluten bonds spontaneously. This process accelerates over time. After 8–12 hours, a well-hydrated dough has developed a surprisingly strong gluten network without any mechanical input.
Professor Raymond Calvel first described autolyse in the 1970s, and Jim Lahey's 2006 no-knead bread recipe (published in the New York Times) popularized the idea that time could fully replace kneading in home baking. The science is not controversial — it is simply chemistry.
2. Stretch and Folds (Minimal Handling)
While pure time can develop gluten sufficiently, a few sets of stretch and folds during the first hour or two of fermentation accelerate the process and improve the dough's structure. Each set takes about 30 seconds: pick up one side of the dough, stretch it upward, fold it over the other side, rotate 90 degrees, repeat four times.
This is not kneading. You are not standing at a counter working the dough for 10 minutes. You are spending 30 seconds, twice, over a two-hour window. That is one minute of total effort.
3. Fermentation Itself
As yeast and bacteria in your sourdough starter ferment the dough, they produce carbon dioxide and organic acids. The gas inflates the gluten network under gentle pressure, stretching it from the inside. The acids also contribute to gluten strength by slightly denaturing the proteins, which makes them bond more tightly. Longer fermentation — like an overnight bulk — means more of this natural strengthening.
The bottom line: A no-knead sourdough that bulk-ferments for 10–14 hours overnight develops gluten through all three mechanisms simultaneously. By morning, the dough is smooth, elastic, and ready to shape — without you having spent a single minute kneading.
The Schedule: Two Realistic Options
The beauty of no-knead overnight sourdough is that it bends to fit your life. Here are two schedules depending on whether you prefer to bake in the morning before work or in the evening after work.
Option A: Morning Bake (Fresh Bread for Breakfast)
| Time | Step | Hands-on |
|---|---|---|
| 8:00–9:00 PM | Feed starter (if not already active) | 2 min |
| 9:00–9:15 PM | Mix dough (all ingredients in one bowl) | 5 min |
| 9:45 PM | First stretch and fold | 30 sec |
| 10:15 PM | Second stretch and fold | 30 sec |
| 10:15 PM – 6:30 AM | Overnight bulk fermentation (sleep) | 0 min |
| 6:30 AM | Shape, place in banneton, into fridge | 5 min |
| 7:00 AM | Preheat oven with Dutch oven inside (230 °C / 450 °F) | 0 min |
| 7:30 AM | Score and bake (lid on 25 min, lid off 20 min) | 3 min |
| 8:15 AM | Cool on rack for at least 30 min | 0 min |
Total hands-on: ~16 minutes. The rest is sleeping, commuting, or drinking coffee.
Option B: Evening Bake (Shape in Morning, Bake After Work)
| Time | Step | Hands-on |
|---|---|---|
| 9:00–9:15 PM | Mix dough | 5 min |
| 9:45 PM | First stretch and fold | 30 sec |
| 10:15 PM | Second stretch and fold | 30 sec |
| 10:15 PM – 6:30 AM | Overnight bulk fermentation (sleep) | 0 min |
| 6:30 AM | Shape, place in banneton, into fridge | 5 min |
| 6:30 AM – 6:00 PM | Cold retard in fridge (go to work) | 0 min |
| 6:00 PM | Preheat oven with Dutch oven (230 °C / 450 °F) | 0 min |
| 6:30 PM | Score and bake straight from fridge | 3 min |
| 7:15 PM | Cool on rack | 0 min |
Total hands-on: ~14 minutes. Option B is even more flexible because the cold retard buys you hours of scheduling freedom. The dough can stay in the fridge for 12–36 hours without problems, so if you get home late, it is still fine.
The Recipe
This recipe produces one medium-large round loaf (~800 g baked weight). It uses a moderate hydration (73%) that is manageable for beginners and a small amount of starter to ensure the long overnight fermentation does not over-proof the dough.
Ingredients
| Ingredient | Weight | Baker's % |
|---|---|---|
| Bread flour (strong white, W700 / Type 550) | 400 g | 80% |
| Whole wheat flour | 100 g | 20% |
| Water (cool, ~18–20 °C / 65–68 °F) | 365 g | 73% |
| Active sourdough starter (at peak or just past) | 50 g | 10% |
| Fine sea salt | 10 g | 2% |
Total flour: 500 g Total water: 365 g (plus water content in starter) Effective hydration: ~73%
Baker's Percentages Breakdown
| Component | Baker's % |
|---|---|
| Bread flour | 80% |
| Whole wheat flour | 20% |
| Water | 73% |
| Salt | 2% |
| Starter (inoculation) | 10% |
Why These Choices
- 80/20 bread flour to whole wheat: The bread flour provides strength and structure. The whole wheat adds flavor, nutrition, and just enough enzymatic activity to support the overnight fermentation without making the dough sticky or hard to handle.
- 73% hydration: High enough to produce a moist, open crumb with a crisp crust, but low enough that the dough is not a terrifying sticky mess for beginners. If you have baked at 75%+ before, you can push this to 75% or even 78%.
- 10% starter (50 g): This is a relatively small inoculation. Combined with cool water, it gives you a 10–14 hour fermentation window — perfect for overnight timing. In warm kitchens (above 24 °C), reduce this to 7–8% (35–40 g).
- Cool water (18–20 °C): Deliberately cool to slow fermentation and prevent over-proofing during the long overnight rest. In winter, room temperature water is usually fine. In summer, use water from the fridge.
Equipment
You do not need specialty baking equipment, but a few things make the process much easier:
- Kitchen scale (essential — weighing is not optional in bread baking)
- Large mixing bowl (at least 3-liter capacity)
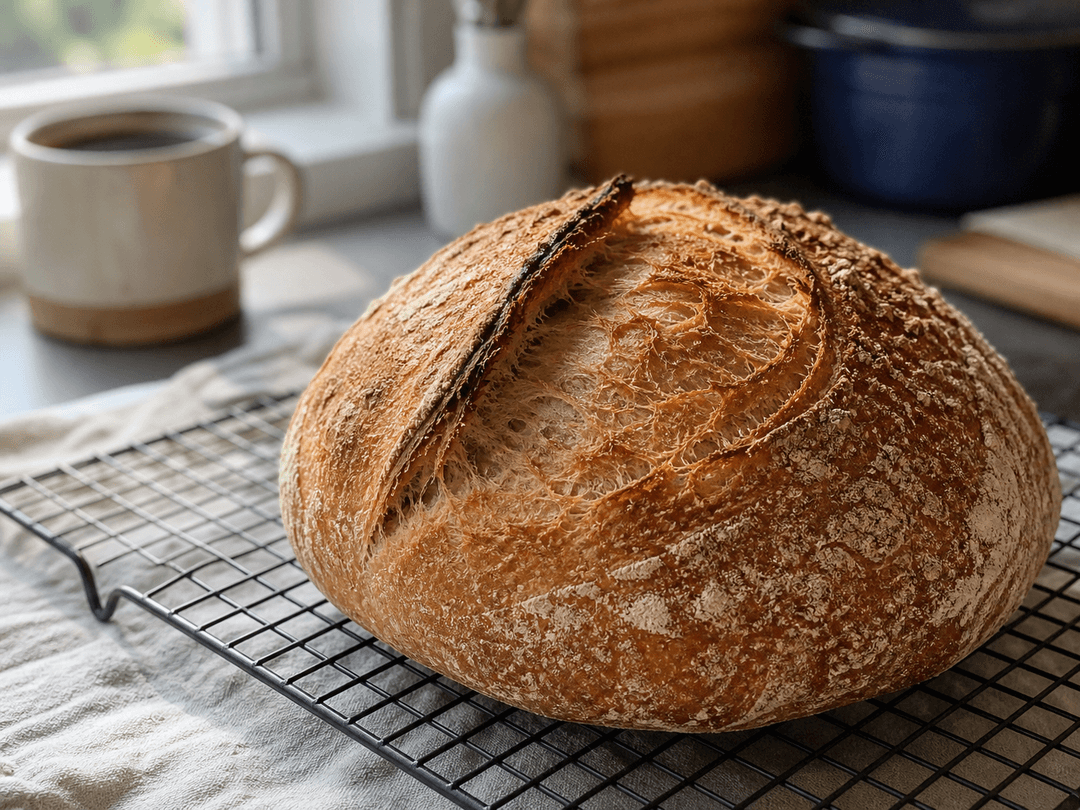
- Dutch oven or cast iron pot with lid (the single most impactful tool for home sourdough — it traps steam, creating the crisp crust and oven spring that define artisan bread)
- Proofing basket (banneton) or a medium bowl lined with a clean, well-floured kitchen towel
- Razor blade or sharp knife for scoring
- Bench scraper (helpful for shaping but not required)
- Parchment paper (makes transferring dough into the hot Dutch oven easy and safe)
Step-by-Step Instructions
Evening (15 Minutes of Work)
Step 1: Check your starter.
Your starter should be active and bubbly — either at its peak or within a few hours of a feeding. If your starter lives in the fridge, take it out in the morning and feed it by early evening so it has time to become active. It should have at least doubled in size since its last feeding.
A float test can help confirm readiness: drop a small spoonful of starter into a glass of water. If it floats, there is enough gas trapped in the starter for it to leaven bread. If it sinks, feed it and wait a few more hours.
Step 2: Mix the dough.
- Weigh the water into your mixing bowl.
- Add the starter and stir to dissolve it roughly into the water. It does not need to be perfectly smooth.
- Add the bread flour and whole wheat flour.
- Add the salt.
- Mix everything with a stiff spatula, dough whisk, or your hand until no dry flour remains. The dough will look rough and shaggy. This is fine. Do not try to make it smooth — time will handle that.
The entire mixing process takes 3–5 minutes. You are not kneading. You are just combining ingredients until they form a cohesive mass.
Step 3: Rest 30 minutes, then stretch and fold (twice).
Cover the bowl with a damp towel, plate, or shower cap. Let it rest for 30 minutes.
After 30 minutes, perform one set of stretch and folds: wet your hand, reach under one side of the dough, stretch it upward as far as it will go without tearing, and fold it over the opposite side. Rotate the bowl 90 degrees and repeat. Do this four times (all four "sides" of the dough). The whole thing takes about 30 seconds.
Cover again. Wait 30 minutes. Repeat one more set of stretch and folds.
After the second set, cover the bowl and leave it alone. You are done for the evening.
Step 4: Go to sleep.
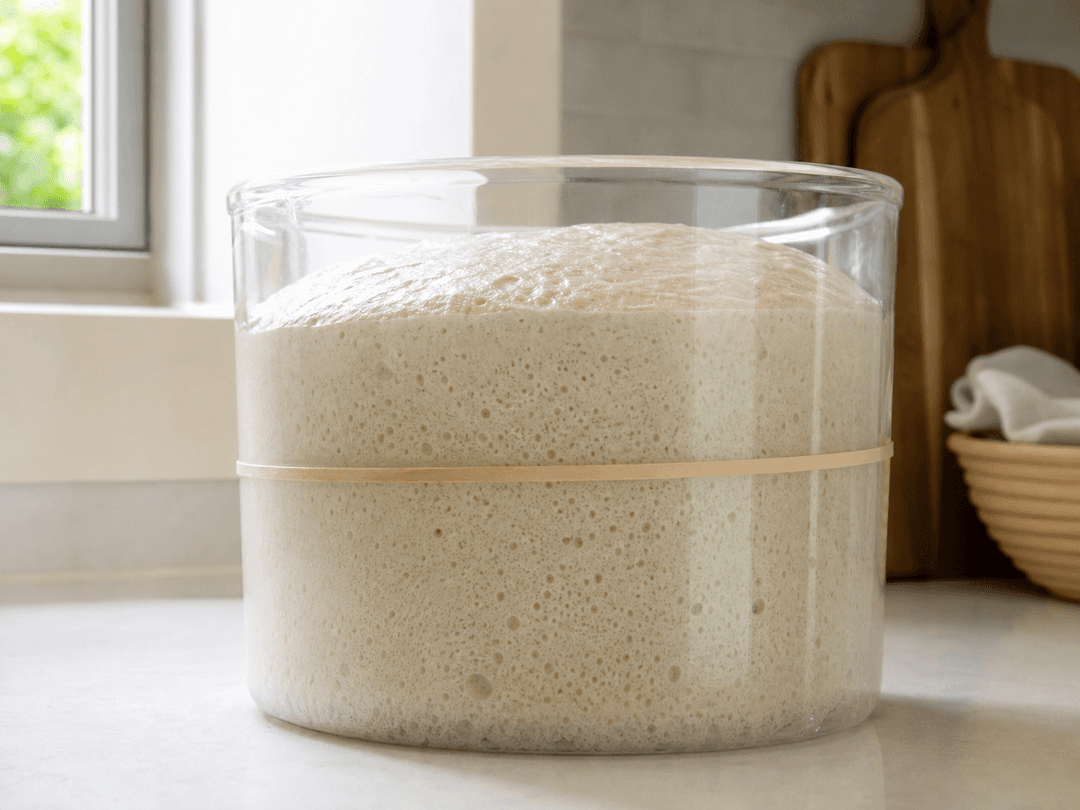
The dough bulk-ferments overnight at room temperature. It does not need attention, turning, checking, or worrying about. Go to bed. The yeast and bacteria will work through the night, producing gas and acid at a gentle pace set by the cool water temperature and low inoculation.
Morning (10 Minutes of Work)
Step 5: Check the dough.
When you wake up (ideally 8–12 hours after mixing), check the dough. It should have risen 50–75% from its original volume. The surface should be slightly domed, dotted with small bubbles, and the dough should jiggle when you gently shake the bowl. It should smell pleasantly tangy and yeasty — not sharp or like acetone.
How to tell if it is ready:
- 50–75% rise from the starting level (if you marked it with a rubber band on a clear container, this is easy to see)
- Bubbly surface with small to medium gas pockets
- Smooth texture — the shaggy mess from last night has transformed into a smooth, slightly puffy dough
- Jiggly when shaken — it moves as a unified mass, not a liquid
What if it has not risen enough? If the dough has barely risen (less than 30%), your kitchen was too cold or your starter was not active enough. Let it sit longer — check every hour until it reaches 50%+. This is not a failure, just a timing adjustment.
What if it has risen too much? If the dough looks deflated, has a strong alcohol smell, or is very sticky and slack, it over-fermented. You can still shape it and bake it — the bread will be tangier and may have less oven spring, but it will still taste good. Next time, use cooler water or less starter.
Step 6: Shape the dough.
Lightly flour your work surface. Gently turn the dough out of the bowl onto the floured surface. You do not need to punch it down or degas it aggressively.
To shape a round (boule):
- Using lightly floured hands or a bench scraper, gently fold the edges of the dough toward the center — top, bottom, left, right — like wrapping a loose package. Flip the dough over so the folds are on the bottom.
- With the dough seam-side down, cup your hands around the back of the dough and gently drag it toward you across the work surface, using the friction of the unfloured counter to create surface tension on the outside of the ball. Rotate slightly and repeat 2–3 times.
- The dough should now be a taut, round ball with a smooth top surface. It does not need to be perfect.
Transfer the shaped dough seam-side up into a well-floured banneton or a bowl lined with a floured towel. Cover with plastic wrap or a towel.
Step 7a (Morning Bake): Preheat and bake.
If you are following the morning bake schedule:
Place the shaped dough in the fridge for 30–60 minutes while the oven preheats. This brief cold rest firms the dough and makes scoring easier.
Preheat your oven to 230 °C (450 °F) with the Dutch oven inside, lid on. Let it preheat for at least 30 minutes (the thermal mass of the Dutch oven needs time to absorb heat).
When the oven is fully preheated:
- Cut a piece of parchment paper slightly larger than your loaf. Place it over the banneton, then flip the whole thing so the dough sits on the parchment, seam-side down.
- Score the dough with a razor blade or sharp knife — a single decisive slash, about 1 cm deep, across the top at a slight angle. This is where the bread will open and expand in the oven.
- Carefully remove the screaming-hot Dutch oven from the oven. Lift the parchment with the dough and lower everything into the pot.
- Put the lid on. Return to the oven.
- Bake 25 minutes with the lid on (trapping steam for crust development and oven spring).
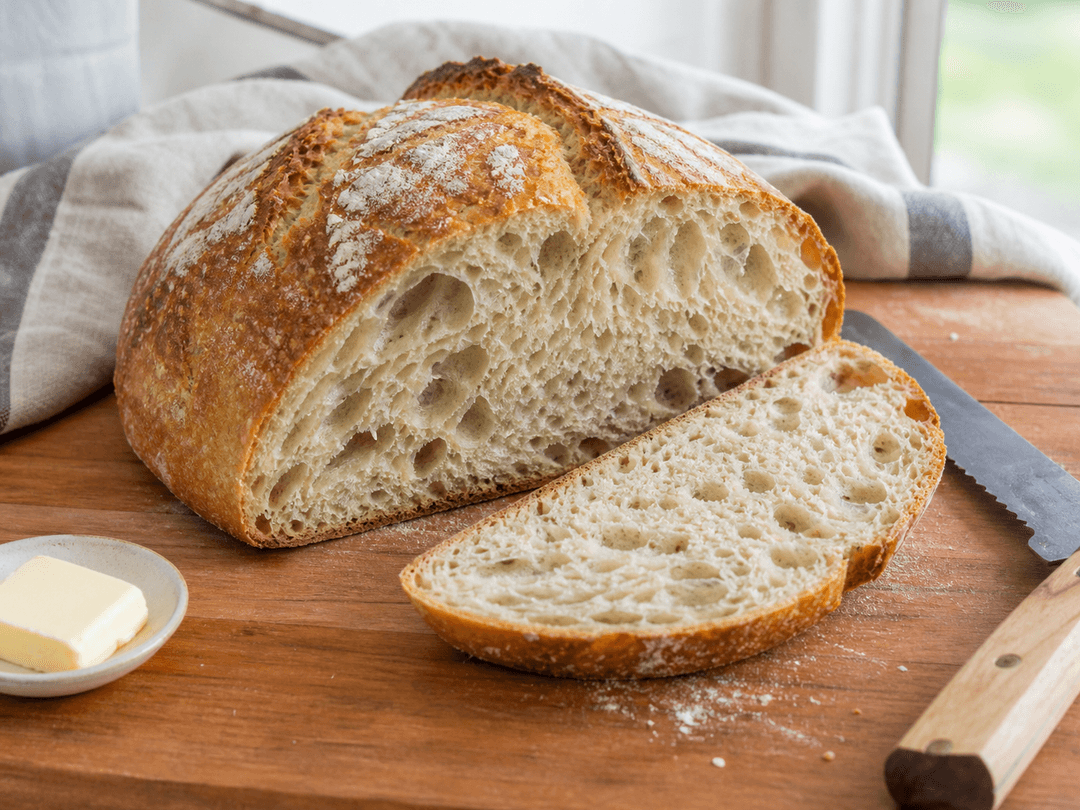
- Remove the lid. Bake another 20–25 minutes until the crust is deep golden-brown to dark brown. Do not underbake — color equals flavor.
- Remove the loaf from the Dutch oven and place on a wire rack. Wait at least 45 minutes before cutting. The interior is still cooking from residual heat, and cutting too early results in a gummy crumb.
Step 7b (Evening Bake): Refrigerate and bake later.
If you are following the evening bake schedule:
After shaping, place the dough in the fridge. It will cold-retard all day while you are at work — anywhere from 8 to 16 hours is perfectly fine. Longer retard (up to 36 hours) is also possible and produces tangier flavor.
When you get home, preheat the oven exactly as described above. Then bake the dough straight from the fridge — do not let it warm up first. The temperature contrast between cold dough and a screaming-hot Dutch oven maximizes oven spring and produces a better ear on your score.
Temperature and Timing Adjustments
The overnight fermentation window depends heavily on your kitchen temperature. Here is how to adjust:
| Kitchen temp | Starter amount | Approx. overnight bulk time | Notes |
|---|---|---|---|
| 18–20 °C (64–68 °F) | 50 g (10%) | 12–16 hours | Cool kitchens are ideal. Very forgiving. |
| 21–23 °C (70–73 °F) | 50 g (10%) | 10–12 hours | The sweet spot for most schedules. |
| 24–26 °C (75–79 °F) | 25–35 g (5–7%) | 8–10 hours | Reduce starter. Use cold water (15 °C). |
| 27+ °C (80+ °F) | 20–25 g (4–5%) | 6–8 hours | Hot kitchens are tricky. Use fridge water. Consider mixing later (11 PM). |
The principle is simple: Warmer temperatures speed up fermentation. If your kitchen is warm, reduce the starter and use colder water to slow things down so the dough does not over-proof before morning.
In winter, most kitchens naturally sit in the 18–22 °C range, which is perfect for overnight sourdough. In summer, you may need to experiment with starter amounts and water temperature to find the right balance for your specific kitchen.
Tips for Fitting Sourdough Into a Busy Life
Keep Your Starter in the Fridge
If you bake once or twice a week, there is no need to feed your starter daily. Keep it in the fridge and feed it the morning or afternoon of bake day. By evening, it will be active and ready to use.
A healthy starter that has been refrigerated for 5–7 days typically needs one feeding at room temperature to wake up fully. If it has been in the fridge for 2+ weeks, give it two feeds over 24 hours before bake day.
Prep on Autopilot
Once you have made this recipe three or four times, mixing the dough becomes muscle memory. You can do it while making dinner, cleaning up the kitchen, or waiting for the kettle to boil. It fits into the crevices of your evening rather than demanding a dedicated block of time.
Embrace Imperfection
Your overnight bulk fermentation will not be the same every time. Sometimes the kitchen is warmer, sometimes cooler. Sometimes the dough rises 50%, sometimes 80%. The beauty of this recipe is that it is forgiving across a wide range. A slightly under-fermented loaf is still delicious bread. A slightly over-fermented loaf is tangier bread. Both are infinitely better than anything from the supermarket.
Batch and Freeze
This recipe scales easily. Double the ingredients, shape two loaves, bake both in sequence. Freeze the second loaf whole (cooled completely first) in a large zip-lock bag. Thaw at room temperature or reheat from frozen in a 180 °C (350 °F) oven for 15 minutes. You now have bread for two weeks from a single evening session.
Use the Discard
If you feed your starter and have discard, it is not waste. Sourdough discard makes excellent pancakes, crackers, pizza dough, and flatbread. Many bakers develop a small repertoire of discard recipes that ensure nothing goes to the compost bin.
Troubleshooting
"My dough is a sticky mess and I can't shape it."
This usually means the dough over-fermented slightly. Over-fermented dough loses its structure and becomes slack and sticky. You can still shape it — use a wet bench scraper and wet hands instead of flour, work quickly, and accept that the loaf will be a bit flatter. It will still taste great. Next time, reduce the starter by 10 g or use cooler water.
Alternatively, if you are new to shaping, the stickiness might simply be unfamiliarity with higher-hydration dough. Practice helps. Wet hands are better than floury hands for handling wet dough.
"My bread is dense and did not rise much."
Under-fermentation. The dough did not bulk long enough or the starter was not active. Check that your starter reliably doubles within 4–6 hours of a feeding before using it to bake. If your kitchen is cold (below 20 °C), extend the overnight bulk by a few hours or use slightly warmer water.
"My bread is very sour."
Longer fermentation and cooler temperatures produce more acetic acid (sharp, vinegar-like sourness). If you prefer milder bread, mix the dough later in the evening so the overnight bulk is shorter, use slightly warmer water (22 °C instead of 18 °C), or skip the cold retard and bake directly after shaping.
"The crust is soft, not crispy."
Insufficient steam during baking. Make sure the Dutch oven lid is on tightly for the first 25 minutes. Also, do not underbake — push the crust to deep golden-brown. Finally, let the bread cool on a wire rack (not on a cutting board or in the pot), as trapped steam softens the crust.
"My score did not open."
Either the blade was not sharp enough (use a fresh razor blade, not a dull knife), or the dough was under-fermented (not enough gas pressure to push the score open), or the score was too shallow (aim for about 1 cm deep at a 30-degree angle).
Scaling the Recipe
The recipe scales linearly. Here are some common variations:
| Loaf size | Flour | Water | Starter | Salt |
|---|---|---|---|---|
| Small (600 g baked) | 375 g | 274 g | 38 g | 8 g |
| Medium (800 g baked) | 500 g | 365 g | 50 g | 10 g |
| Large (1 kg baked) | 625 g | 456 g | 63 g | 13 g |
| Double batch (2 loaves) | 1000 g | 730 g | 100 g | 20 g |
Maintain the 80/20 bread flour to whole wheat ratio, or adjust to taste. More whole wheat (up to 30–40%) gives a heartier, nuttier loaf but absorbs more water — add 5–10 g extra water per 50 g of additional whole wheat.
Variations
Seeded Loaf
Add 50–75 g of mixed seeds (sunflower, pumpkin, sesame, flax) during the initial mix. Seeds add texture, nutrition, and a nutty flavor without changing the method or timing.
Olive and Rosemary
During the second stretch and fold, spread 80 g of pitted, roughly chopped olives and 1 tablespoon of finely chopped fresh rosemary over the dough surface before folding. The inclusions get distributed through the folds without additional mixing.
Darker, More Flavorful
Replace the whole wheat flour with dark rye flour (same 100 g). The rye adds a deeper, earthier flavor and darker crumb. Rye absorbs more water, so increase total water by 10–15 g. The dough will be stickier — this is normal for rye.
Weekday Sandwich Loaf
Shape the dough into a log instead of a round and proof it in a greased 23 x 13 cm (9 x 5 inch) loaf pan. Cover with plastic wrap, refrigerate overnight (or all day), and bake uncovered at 200 °C (400 °F) for 40–45 minutes. A slightly lower oven temperature prevents the top from browning too fast. This makes a perfectly shaped loaf for sandwiches.
Use recipe management directly in the proofit app — baking made simple.
See the sourdough app →Frequently Asked Questions
Can I make no-knead sourdough with all-purpose flour instead of bread flour? Yes, but the result will be slightly different. All-purpose flour has less protein (typically 10–11%) than bread flour (12–14%), which means less gluten development. The crumb will be softer and more tender, with slightly less oven spring. Many bakers prefer this. If you only have all-purpose flour, use it — the bread will still be excellent. Consider reducing hydration by 10–15 g (to about 70%) since lower-protein flour absorbs less water.
How do I know if my starter is active enough for overnight baking? Your starter should reliably double in volume within 4–6 hours of a feeding at room temperature. If it takes longer than 8 hours to double, it is not vigorous enough for overnight baking — the dough will under-ferment. Feed your starter daily for 3–5 days to strengthen it before attempting the recipe.
What if I do not have a Dutch oven? You can bake on a preheated baking stone or heavy baking sheet with a steam method: place a metal roasting pan on the bottom rack while the oven preheats, then pour about 200 ml of boiling water into the pan immediately after loading the bread. Remove the pan after 20 minutes. The results will not be quite as dramatic as a Dutch oven (which traps steam more effectively), but you will still get a crisp crust and good oven spring.
Can I skip the stretch and folds entirely? Yes. The bread will still work. Gluten develops through hydration and time alone. However, the two sets of stretch and folds take a total of one minute and noticeably improve the dough's structure, making shaping easier and producing a slightly more open crumb. They are worth the effort.
My kitchen is very warm in summer (28+ °C). Can I still do overnight sourdough? Yes, but you need to adjust. Reduce the starter to 20–25 g (4–5%), use cold water straight from the fridge (about 8–10 °C), and consider mixing the dough later in the evening (10:30–11:00 PM) to shorten the overnight window. If your kitchen stays above 28 °C, you may need to bulk-ferment in the fridge from the start — mix, do your folds, then place the entire bowl in the fridge overnight. The dough will ferment very slowly at fridge temperature and may need 18–24 hours, but it will not over-proof.
How long can I cold-retard the shaped dough in the fridge? Comfortably 12–36 hours. Some bakers push to 48 hours for very tangy bread. Beyond 48 hours, the dough starts to degrade — the acid weakens the gluten network, and the bread becomes increasingly flat and sour. For most people, shaping in the morning and baking in the evening (10–12 hours of cold retard) produces the best combination of flavor and structure.
Is no-knead bread as good as kneaded bread? Different, not worse. No-knead bread tends to have a more open, irregular crumb with larger holes — many bakers actually prefer this. Kneaded bread (especially bread mixed intensively) has a finer, more uniform crumb. Both can be excellent. The long fermentation in no-knead bread produces more complex flavor than a short-fermented, heavily kneaded loaf.
Do I need to use whole wheat flour, or can I use 100% bread flour? You can use 100% bread flour. The result will be a milder-flavored loaf with a lighter crumb. The whole wheat adds flavor complexity, fermentation food (whole wheat has more wild yeast and enzymatic activity), and a slightly heartier texture. But the recipe works perfectly well with 100% white bread flour if that is what you prefer or have on hand.
Why do you recommend cool water? Most recipes say warm water. Most recipes are designed for a 3–5 hour daytime bulk fermentation, where warm water (around 28 °C) helps the dough reach the target temperature for efficient fermentation. This recipe is designed for a 10–14 hour overnight bulk, so you deliberately use cool water (18–20 °C) to slow fermentation and prevent over-proofing while you sleep. Warm water in a long overnight bulk would almost certainly result in over-fermented dough by morning.
Can I make this recipe with commercial yeast instead of sourdough? Technically yes, but it becomes a different bread. Use 1–2 g (about half a teaspoon) of instant yeast in place of the 50 g starter, and reduce the water by about 25 g (since the starter contributes some water). The method and timeline are the same. The bread will lack the complex sour flavor of sourdough, but the texture will be similar.
What is the best way to store the baked loaf? Store cut-side down on a cutting board at room temperature, or in a bread bag or linen cloth. Do not store sourdough in a sealed plastic bag — it traps moisture and makes the crust go soft and chewy. A well-baked sourdough loaf stays fresh for 3–4 days at room temperature. After that, slice and toast it — stale sourdough makes the best toast. For longer storage, slice the cooled loaf and freeze individual slices. They thaw in minutes at room temperature or can go straight into the toaster.